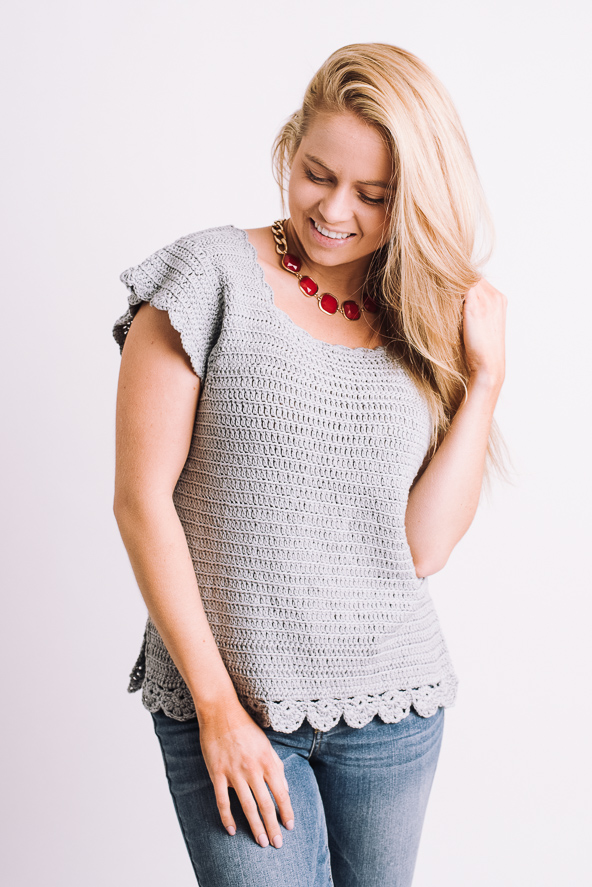
Decorate a crochet top with scallops at the hem, sleeves and neck and watch this easy piece transform into a must-have pattern. Pair this versatile top with your favorite pair of jeans or dressed up with a pencil skirt.
Skill Level: Intermediate
Size: Finished Bust Size 34.25 (38, 42, 45.5, 49.5, 53.25)” to fit bust 32 (36, 40, 44, 48, 52)”
0-2” positive ease recommended.
Shown in size 38”
Gauge: 17 sts and 8 rows = 4” [10 cm] in dc after wet blocking
Materials
 Yarn: Nako Calico (50% cotton, 50% acrylic; 267 yards [245 meters]/100 grams): CL10255, Grey (3 (3, 4, 4, 5, 6) balls)
Hook: US size G/6 (4.0 mm)
Notions: Cable needle, tapestry needle, stitch markers
Downloads
Special stitches
Inverted V stitch – *Yo hook once, insert hook into next ch-2 sp, yo, pull up yarn, yo, pull yarn through 2 lps; rep from * once more, yo, pull yarn through all 3 lps on hook.
3 dc cluster – Yo hook once, insert into ch-1 sp, yo, pull up yarn, yo, pull yarn through 2 lps, *yo hook once, insert into same sp, yo, pull up yarn, yo, pull yarn through 2 lps; rep from * once more, yo, pull yarn through all 4 lps on hook.
Pattern Notes
The top is worked from the bottom up in the round to the underarms where it is split to work the front and back separately.
Stitches are picked up at the front and back hems, neck and sleeves to work scalloped edges.
The turning chain/beginning chain counts as first dc throughout.
Pattern
Back Hem
Ch 75 (83, 91, 99, 107, 115).
Set-up Row (RS): Dc in 4th ch from hook, *dc in next ch; rep from * to end, turn. (73 (81, 89, 97, 105, 113) dc)
Next Row (WS): Ch 3, *dc in next dc; rep from * to end.
Rep last row 6 more times.
Fasten off. Break yarn.
Front Hem
Work same as for Back Hem. Do not break yarn.
Join Hems
Next Row (RS): Ch 3, *dc in next dc; rep from * to end of Front Hem, dc in first dc of Back Hem, **dc in next dc; rep from ** to end of Back Hem, join with sl st to 3rd ch of beg ch. (146 (162, 178, 194, 210, 226) dc)
Next Rnd: Ch 3, *dc in next dc; rep from * to end, sl st in 3rd ch of beg ch.
Rep last rnd until piece meas about 12.5”.
Divide for Front and Back
Next Row (RS): Ch 1, sl st in next 11 (14, 17, 20, 23, 26) sts, ch 3, dc in next 52 (54, 56, 58, 60, 62) sts, turn and cont working back and forth for Front. (53 (55, 57, 59, 61, 63) dc)
Front
Next Row (WS): Ch 3, *dc in next st; rep from * to end. (53 (55, 57, 59, 61, 63) dc)
Rep last row 5 (6, 7, 8, 9, 10) more times.
Sizes 34.25 (-, 42, -, 49.5, -)” only
Next Row (WS): Ch 3, dc in next 13 (-, 15, -, 15, -) sts, turn. (14 (-, 16, -, 16, -) dc)
Right Shoulder
Rep last row 7 more times. Break yarn.
Left Shoulder
With WS facing, beg at the edge of Right shoulder, sk next 25 (-, 25, -, 29, -) sts for Front Neck, join yarn, ch 3, dc in next 13 (-, 15, -, 15, -) sts, turn.
Next Row (RS): Ch 3, dc in each st to end. (14 (-, 16, -, 16, -) dc)
Rep last row 6 more times.
Fasten off. Break yarn.
Sizes – (38, -, 45.5, -, 53.25)” only
Next Row (RS): Ch 3, dc in next – (14, -, 14, -, 16) sts, turn. (- (15, -, 15, -, 17) dc)
Left Shoulder
Rep last row 7 more times. Break yarn.
Right Shoulder
With RS facing, beginning at the edge of Left shoulder, sk – (25, -, 29, -, 29) sts for Front Neck, join yarn, ch 3, dc in next – (14, -, 14, -, 16) sts, turn.
Next Row (RS): Ch 3, dc in each st to end. (- (15, -, 15, -, 17) dc)
Rep last row 6 more times.
Fasten off. Break yarn.
All Sizes
Back
With RS facing, beg at Right Front edge, sk 20 (26, 32, 38, 44, 50) sts for right armhole, join yarn, ch 3, dc in next 52 (54, 56, 58, 60, 62) sts, turn.
Next Row (WS): Ch 3, dc in each st to end, turn. (53 (55, 57, 59, 61, 63) dc)
Cont working same as Front reversing Right and Left shoulders.
Seam shoulders.
Right Sleeve
With RS facing, join yarn at front edge of right underarm, ch 3, work 64 (68, 72, 76, 80, 84) dc along right armhole only, leaving underarm, turn. (65 (69, 73, 77, 81, 85) dc)
Next Row: Ch 3, dc in each st to end, turn.
Rep last row until Sleeve meas 2.5 (3, 3.75, 4.5, 5.25, 6)”, ending with a WS row, turn.
Next Row (RS): Ch 1, *sk next st, 5 dc in next st, sk next st, sc in next st; rep from * to end.
Left Sleeve
With RS facing, join yarn at front edge of left underarm, ch 3, work 64 (68, 72, 76, 80, 84) dc along left armhole only, leaving underarm, turn. (65 (69, 73, 77, 81, 85) dc)
Work same as for Right Sleeve.
Front Hem
With RS facing, join yarn at right edge of front hem and begin working on opposite side of foundation chain.
Row 1 (RS): Ch 1, sc in same place, *sk next 3 sts, ch 2, (2 dc, ch 2, 2 dc) in next st, sk next 3 sts, ch 2, sc in next st; rep from * to end, turn.
Row 2 (WS): Ch 1, sc in next st, sk next ch-2 sp, ch 2, [dc, (ch 2, dc) 4 times] in next ch-2 sp, sk next ch-2 sp, ch 2, *sc in next sc, sk next ch-2 sp, ch 2, [dc, (ch 2, dc) 4 times] in next ch-2 sp, sk next ch-2 sp, ch 2; rep from * to end, sc in turning ch, turn.
Row 3 (RS): Ch 1, sc in first st, *ch 1, 3 dc cluster in next ch-1 sp, (ch 3, 3 dc cluster in next ch-1 sp) 3 times, ch 1, sc in next sc; rep from * to end.
Back Hem
With RS facing, join yarn and begin working on opposite side of foundation chain, along back hem.
Work same as for Front Hem.
Neck
With RS facing, join yarn at left edge of Front Neck.
Work as follows around the neck: Ch 1, *sk next st, 5 dc in next st, sk next st, sc in next st; rep from * to end of Front Neck, sc in base of right edge of Front Neck, **5 dc in top of next row, sc in top of next row; rep from ** along right edges of front and back neck, sc in first st of Back Neck, *sk next st, 5 dc in next st, sk next st, sc in next st; rep from * to end of Back Neck, sc in base of left edge of Back Neck, **5 dc in top of next row, sc in top of next row; rep from ** along right edges of Back Neck and Front, join with sl st in first ch-1.
Finishing
Seam Sleeves to underarms.
Weave in ends.
Block to finished measurements.


For some reason the schematic is.png.pdf. It’s an invalid format.
Hello! We are working with our tech team to fix this, thank you for your patience in the meantime! – Nicola, Editor
I agree – the pattern schematic is very tiny and almost impossible to see. Please fix this so it can be used. Thank you.
Hi there, we’ve enlarged the schematic: https://www.ilikecrochet.com/wp-content/uploads/Claire-Scallop-Top-Schematic-1.png
Thanks for bringing this to our attention! – Nicola, Editor
Can you please put the measurement in jpg because when you used png file it is hard to see it . I can understand it for putting up on your web site but us to download it can’t be seen clear.
Thanks Teresa
Hi there, so sorry about that! The schematic has been updated: https://www.ilikecrochet.com/wp-content/uploads/Claire-Scallop-Top-Schematic-1.png
– Nicola, Editor