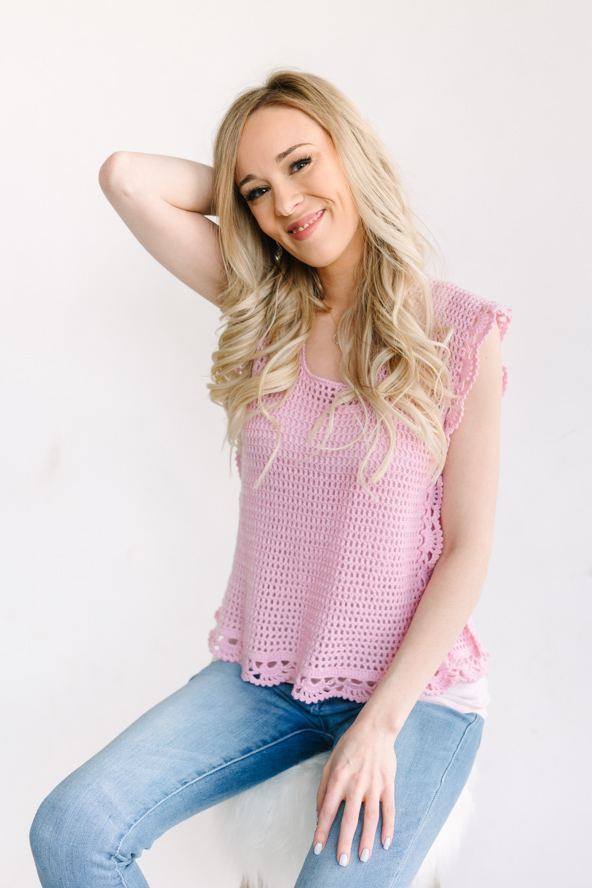
The Luisa Scalloped Topper is worked in four panels, consisting of a front panel, a back panel and two side panels. This construction technique allows for ease of customization and ensures a perfect fit. Each panel is worked separately and then seamed together, resulting in a seamless and professional finish. Pair the Luisa Scalloped Topper with high-waisted jeans or a flowing skirt for a bohemian-inspired look, or layer it over a sleeveless dress for an elegant and feminine touch. The versatility of this topper allows you to create a variety of outfits suitable for both casual and formal occasions.
Time: 50-Hour project
Skill Level: Intermediate
Size: Finished Bust Size 36 (40, 44, 48, 52)” to fit bust 34 (38, 42, 46, 50)”
2” positive ease recommended.
Shown in size 36”
Gauge: 22 dc and 11 rows = 4” [10 cm] in double crochet after wet blocking
Materials
 Yarn: Berroco Ultra wool Fine (100% superwash wool; 400 yards [366 meters]/100 grams): 5310 Alysum (MC, 2 (3, 3, 4, 5) balls)
Hook: US size D (3.25 mm)
Notions: Tapestry needle
Pattern Notes
This pattern is worked in four panels (front, back and side panels). The edging is worked along the side of front and back panels then the bottom edging is worked after the piece is put together. When working neck shaping right-hand or left-hand sides are as worn.
Pattern
Back Panel
Ch 100 (100, 112, 112, 124).
Row 1 (Base row): Dc in 3rd ch from hook (skipped chs count as a st), dc in every ch across, turn. 99 (99, 111, 111, 123) dc
Row 2: Ch 3 (counts as dc, ch 1), * sk next dc, dc in next dc, ch 1; rep from * end with dc in 2nd ch, turn. 50 (50, 56, 56, 62) dc
Row 3: Ch 3, * dc in next dc, ch 1; rep from *, end with dc in 2nd ch, turn.
Repeat row 3 until piece measures 21 (21, 22, 22, 23)”.
Back neck shaping (right-hand side)
Row 1: Work as row 3 on next 18 (18, 20, 20, 21) dc, hdc in next dc, turn.
Row 2: Ch 2, dc in next dc work as row 3, turn.
Row 3: Ch 3, * dc in next dc, ch 1; rep from * on next 16 (16, 18, 18, 19) dc, hdc in next dc. Fasten off.
Back neck shaping (left-hand side)
Row 1: Sk next 12 (12, 14, 14, 20) dc, attach yarn to next dc, ch 2, work as row 3 on last 18 (18, 20, 20, 21) dc, turn.
Row 2: Work as row 3 on next 17 (17, 19, 19, 20) dc, hdc in next ch-2, turn.
Row 3: Ch 2, * dc in next dc, ch 1; rep from *, end with dc in 2nd ch, turn. Fasten off.
Front Panel
Work same as back panel until piece measures 14 (14, 15, 15, 16)”.
Front neck shaping (left-hand side)
Row 1: Work as row 3 on next 18 (18, 20, 20, 21) dc, hdc in next dc, turn.
Row 2: Ch 2, dc in next dc work as row 3, turn.
Row 3: Work as row 3 on next 16 (16, 18, 18, 19) dc, hdc in next dc.
Row 4: Ch 3, * dc in next dc, ch 1; rep from *, end with dc in 2nd ch, turn.
Repeat row 4 until piece measures 22 (22, 23, 23, 24)”. Fasten off.
Front neck shaping (right-hand side)
Row 1: Sk next 12 (12, 14, 14, 22) dc, attach yarn to next dc, ch 2, work as row 3 to end, turn.
Row 2: Work as row 3 on next 17 dc, hdc in next dc, turn.
Row 3: Ch 2, dc in next dc work same as row 3.
Row 4: Ch 3, * dc in next dc, ch 1; rep from *, end with dc in 2nd ch, turn.
Repeat row 4 until piece measures 22 (22, 23, 23, 24)”. Fasten off.
Side Panel (make 2)
Ch 23 (35, 35, 41, 39).
Row 1 (Base row): Dc in 3rd ch from hook, dc in every ch across, turn. 22 (34, 34, 40, 38) dc
Row 2: Ch 3, *sk next dc, dc in next dc, ch 1; rep from * end with dc in 2nd ch, turn. 11 (17, 17, 20, 19) dc
Row 3: Ch 3, * dc in next dc, ch 1; rep from *, end with dc in 2nd ch, turn.
Repeat row 3 until piece measures 13 (13, 13.5, 13.5, 14)”.
Finishing
Side edging
Sew shoulder seams.
With right side facing work on the edging along the sides of front and back.
Row 1: Attach yarn to the edge of the bottom corner, * ch 7, sk next side dc or ch-2 sp, sc in next side dc or ch-2 sp; rep from * across ending with ch 3, dc in last side dc or ch-2 sp, turn.
Row 2: Ch 3, 3 dc in ch-3 sp, * sc in next ch-7 sp, ch 7, sc in next ch-7 sp, 7 dc in next ch-7 sp; rep from * across ending with 4 dc in last ch-7 sp, turn.
Row 3: Ch 3, dc in next dc, ch 1, dc in next dc, * ch 3, sc in next ch-7 sp, ch 3, sk next dc, (dc in next dc, ch 1) 4 times, dc in next dc; rep from *, end with sk next dc, (dc in next dc, ch 1) twice, dc in 3rd ch, turn.
Row 4: Ch 1, sc in first ch-1 sp, sc in next ch-1 sp, ch 3, sc in same ch-1 sp, * (sc in next ch-3 sp, [ch 3, sc in same ch-3 sp] twice) twice, (sc in next ch-1 sp, ch 3, sc in same ch-1 sp) 4 times; rep from *, end with (sc in next ch-1 sp, ch 3, sc in same ch-1 sp) twice. Fasten off.
Repeat for the other side of the front and back panel.
Sew side panels making sure to keep the side edgings to the front of work.
Bottom edging
Rnd 1: With right side facing, attach yarn to the center back, * ch 7, sk next 3 dc, sc in next dc; rep from *, end with ch 3, dc in first sp.
Rnd 2: * 7 dc in next ch-7 sp, sc in next ch-7 sp, ch 7, sc in next ch-7 sp; rep from * around, end with ch 3, dc in last ch-7 sp.
Rnd 3: * Ch 3, sk next dc, (dc in next dc, ch1) 4 times, dc in next dc, ch 3, sc in next ch-7 sp; rep from * around, end with ch 3, dc in last ch-7 sp.
Rnd 4: Sc in next ch-3 sp, * (ch 3, sc in same ch-3 sp) twice, (sc in next ch-1 sp, ch 3, sc in same ch-1 sp) 4 times, (ch 3, sc in same ch-3 sp) twice; rep from * around. Fasten off.
Neckline finishing
Rnd 1: With right side facing, attach yarn to the center back neck, ch 1, on the back neck and front neck sc in every ch 1, and dc, on the sides, 2 sc in every dc or ch-2 sp around, end with sl st into the first ch.
Rnd 2: Reverse sc in every sc around. Fasten off.
Weave in all ends.
Block topper to size.


Nicola I have emailed and emailed with no reply. I was told to download adobe so I paid for it and still adobe was unable to open it. I was told to do other things and none of those worked. I recently upgraded to gold and this is disheartening. Since nobody answers please reply back here when this is all fixed.
Hello! Our tech team is working on a fix for this issue. In the meantime, charts and diagrams should be able to be downloaded when using Google Chrome or Safari browsers when subscribers are logged in. Thank you for your patience as we work to improve the downloads functionality! – Nicola, Editor
Why don’t any of the schematics open up.You have them saved in png files.
Hello! We are working with our tech team to fix this, thank you for your patience in the meantime! – Nicola, Editor