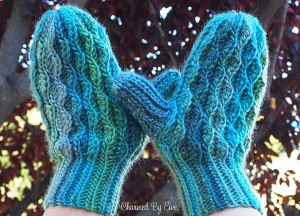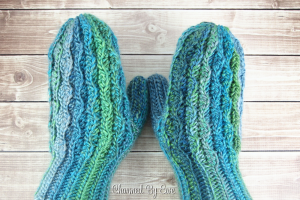
The crisp, icy tones of the Wonderland Mittens are calling my name today—but they’ve been doing that every day since we gathered the materials! Waiting for the next step of this crochet pattern was like anticipating the first snow, which is one of my favorite parts of the year. Janaya Chouinard’s cozy crochet mittens promise to be a stylish way to stay warm for the rest of the winter, and they would make great gifts for kids or adults.
Grab that beautiful variegated yarn, a hook, and the pattern below to get started on the first part of these mittens!
First, a note about gauge:
There is a different gauge for each section of this project, so be sure to keep track.
- Gauge in HDC: 14 stitches and 11 rows = 4″ (10 cm)
- Gauge in Wave Pattern: 8.5 stitches and 8 rows = 2″ (5 cm)
- Gauge in Slip Stitch Cuff: 9 stitches and 12 rows = 2″ (5 cm)
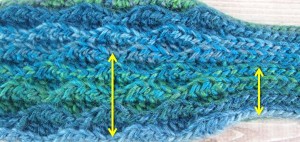
After Row 8, your work should measure: 2″ across the Wave Pattern and 1.33″ across the Slip Stitch Cuff. If your cuff measurement is less, adjust your tension on the slip stitches so they are not as tight.
A few more instructions:
- The beginning chain-1 does not count as a stitch.
- Start each row in the first stitch of the row.
- It’s helpful to use stitch markers to keep track of the first and last slip stitch of the row.
- The instructions are the same for the left and right hands.
- The cuff portion is worked completely in slip stitches. It will look small when complete, but stretches quite a bit if you keep your slip stitches loose.
Abbreviations:
- ch(s) = chain(s)
- sl = slip
- st(s) = stitch(es)
- hdc = half double crochet
- RS = right side of work
Mitten Pattern:
Child (5-10 Years) • Palm circumference = 6″ – 7.5″
Row 1 (RS): Ch 40, working in the back bumps of the chain, sl st in 2nd ch from hook, sl st in next 14 chs, *hdc in next 3 chs, sl st in next 3 chs*, repeat between * to end, turn (39)
For the remainder of the pattern, work in the Back Loops only.
Row 2: Ch 1, sl st in first 3 sts, hdc in next 3 sts, *sl st in next 3 sts, hdc in next 3 sts*, repeat between * 2 more times, sl st in next 15 sts, turn (39)
Row 3: Ch 1, sl st in first 18 sts, *hdc in next 3 sts, sl st in next 3 sts*, repeat between * 2 more times, sl st in next 3 sts, turn (39)
Row 4: Ch 1, sl st in first 6 sts, *hdc in next 3 sts, sl st in next 3 sts*, repeat between * 2 more times, sl st in next 15 sts, turn (39)
Row 5: Ch 1, sl in first 15 sts, *hdc in next 3 sts, sl st in next 3 sts*, repeat between to end, turn (39)
Row 6 through Row 14: Repeat Row 2 through Row 5, ending with a repeat of Row 2
The next Row creates the thumb opening.
Row 15: Ch 1, sl st in first 18 sts, hdc in next 2 sts, ch 4, skip 4 sts, hdc in next 3 sts, *sl st in next 3, hdc in next 3*, sl st in next 6 sts, turn (39)
Row 16 – 17: Repeat Row 4 & Row 5
Row 18 through Row 28: Repeat Row 2 through Row 5, ending with a repeat of Row 4
With the Wrong Side facing out, bring the edges of the mitten together for seaming. Working through the front loops of the row closest to you and the back loops of the row furthest from you, slip stitch across. Fasten off, leaving a lengthy tail for seaming the top.
To close the opening at the fingertips, pass the tail through the end of every other row, inserting the needle from the outside-in and only catching one strand of yarn with each pass. Catching more than one strand will make it too bulky to close the hole completely. Pull gently on the tail as you go to draw the opening closed. Secure the tail, and weave in all ends. Turn the mitten right-side out to work the thumb.
Teen / Adult • Palm circumference = 7.5″ – 9″
Finished mittens should fit most adults. For extra-large hands, go up one hook size from gauge.
Row 1 (RS): Ch 46, working in the back bumps of the chain, sl st in 2nd chain from hook, sl st in next 14 chs, *hdc in next 3 chs, sl st in next 3 chs*, repeat between * to end, turn (45)
For the remainder of the pattern, work in the Back Loops only.
Row 2: Ch 1, sl st in first 3 sts, hdc in next 3 sts, *sl st in next 3 sts, hdc in next 3 sts*, repeat between * 3 more times, sl st in next 15 sts, turn (45)
Row 3: Ch 1, sl st in first 18 sts, *hdc in next 3 sts, sl st in next 3 sts*, repeat between * 3 more times, sl st in next 3 sts, turn (45)
Row 4: Ch 1, sl st in first 6 sts, *hdc in next 3 sts, sl st in next 3 sts*, repeat between * 3 more times, sl st in next 15 sts, turn (45)
Row 5: Ch 1, sl in first 15 sts, *hdc in next 3 sts, sl st in next 3 sts*, repeat between to end, turn (45)
Row 6 through Row 16: Repeat Row 2 through Row 5, ending with a repeat of Row 4
The next Row creates the thumb opening.
Row 17: Ch 1, sl st in first 15 sts, hdc in next 3 sts, sl st in next st, ch 7, skip 7 sts, sl st in next st, *hdc in next 3, sl st in next 3*, repeat between * to end, turn (45)
Row 18 through Row 32: Repeat Row 2 through Row 5, ending with a repeat of Row 4
With the Wrong Side facing out, bring the edges of the mitten together for seaming. Working through the front loops of the row closest to you and the back loops of the row furthest from you, slip stitch across. Fasten off, leaving a lengthy tail for seaming the top.
To close the opening at the fingertips, pass the tail through the end of every other row, inserting the needle from the outside-in and only catching one strand of yarn with each pass. Catching more than one strand will make it too bulky to close the hole completely. Pull gently on the tail as you go to draw the opening closed. Secure the tail, and weave in all ends. Turn the mitten right-side out to work the thumb.
You’re off to a great start! We will pick back up on the thumb and the finishing touches for next time. There will also be a printable version and a diagram to help you visualize the pattern.
If you’re enjoying this design, you can explore even more crochet ideas while you wait for the final stage. For great patterns, inspiration, tips, and more, subscribe to I Like Crochet magazine.


On the Wonderland Mittens pattern I don’t see what kind on yarn to use or a crochet hook size. How do I find it?
Thanks
Thank you for this pattern, I love to make mittens, this pattern is beautiful to add to my crochet mittens. Thank you for sharing.
Jennie
Hi I am a beginner I do not quite understand how to read these paterns can you help me?
What’s the yarn and hook size?
These are BEATUIFUL! Would it be okay if I sold them, giving you credit for the pattern and a link to your website? Thanks!
No thumb instructions on pattern
No thumb instructions on mitten pattern
Please notify me when thumb & finishing are posted. These are awesome!