


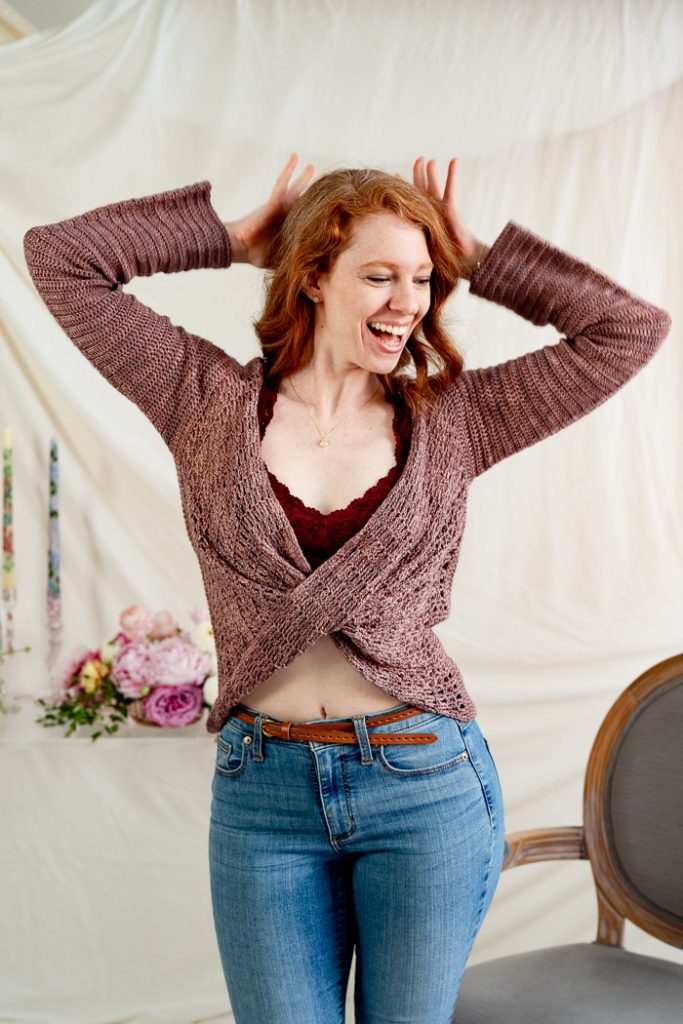
The Chic Twist Top is a versatile wardrobe staple that stands out for its simplicity and ease of construction. Designed with minimal joining and seaming, it becomes the go-to project for crocheters of all levels. The innovative construction method involves crocheting the front and back of the top as a single piece, requiring only one seam to complete the garment seamlessly.
Perfect for beginners, this pattern offers a straightforward introduction to garment crochet, focusing on basic stitches and clear instructions. Whether worn casually or dressed up, the Chic Twist Top showcases effortless style and comfort, making it an essential addition to any wardrobe.
Time: Up to a 4-week project
Skill Level: Easy
Sizes written as XS (S, M, L, XL) (2X, 3X, 4X): Finished Bust Size 32 (36, 40, 44, 48) (52, 56, 62)” to fit bust 30 (34, 38, 42, 46) (50, 54, 58)”
2-4” positive ease recommended.
Shown in size 36”
Gauge: 19 sts and 13 rows = 4” [10 cm] in back st pattern (alternating 1 row dc with 1 row sc) after wet blocking
Materials (format label as heading 4)
 Yarn: Expression Fiber Arts Luster Sport (50% Superwash Merino Wool, 50% Lyocell; 395 yards [361 meters] / 4 ounces [113 grams]): #321, Woodgrain (MC 3 (4, 4, 4, 5) (5, 6, 6) balls)
Hook: US size F/5 3.75 mm
Notions: Stitch markers, tapestry needle
Special Stitches
Treble Crochet V Stitch (tr V-st) = (tr, ch 1, tr) in indicated stitch or space
Beginning Treble Crochet (beg tr) aka stacked single crochet = do not ch 1 to start the row/rnd unless indicated in the pattern, sc in first st, (sc in left vertical bar of sc just made) 2 times
Pattern Notes
– This top is worked sideways starting at one arm opening, working the back, working the second arm opening and then working the front. Sleeves are added after the main body of the top is worked.
– The front twist will be formed and seamed after the top has been wet blocked. The neck shaping will then be added as the last step.
– Beginning ch 1 and beginning ch 2 does not count as a stitch.
– Sleeves are worked in joined turned rounds.
– Sleeve length can always be adjusted for personal preference by working to a desired length.
Pattern
Back
Ch 95 (95, 95, 98, 98) (101, 101, 104).
Row 1: Sc in second ch from hook, sc in each ch across. (94 (94, 94, 97, 97) (100, 100, 103) sc)
Row 2 (RS): Ch 2 (does not count as a st here and throughout) turn, dc in first, dc in each st across.
Row 3: Ch 1, turn, sc in first, sc in each st across.
Row 4 (Armhole 1): Ch 2, turn, dc in first, dc in next 9 (9, 9, 10, 10) (11, 11, 12), ch 28 (28, 28, 29, 29) (30, 31, 32), sk the same number of sts as chained, dc in next, dc in each across. (66, (66, 66, 68, 68) (70, 69, 71) dc)
Row 5: Ch 1, turn, sc in first, sc in each st across to ch sts, sc in each ch st, sc in remaining. (94 (94, 94, 97, 97) (100, 100, 103) sc)
Rows 6-53 (59, 65, 71, 77) (83, 89, 97): Repeat Rows 2-3.
Row 54 (60, 66, 72, 78) (84, 90, 98) (Armhole 2): Repeat Row 4. (66, (66, 66, 68, 68) (70, 69, 71) dc)
Row 55 (61, 67, 73, 79) (85, 91, 99): Ch 1, turn, sc in first, sc in each st across to ch sts, sc in each ch st, sc in remaining. (94 (94, 94, 97, 97) (100, 100, 103) sc)
Row 56 (62, 68, 74, 80) (86, 92, 100): Ch 2, turn, dc in first, dc in each st across.
Row 57 (63, 69, 75, 81) (87, 93, 101): Ch 1, turn, sc in first, sc in each st across.
Do not fasten off. Continue to Front.
Front
Row 1: Turn, beg tr in first, tr in next, sk 1, tr V-st in next, *sk 2, tr V-st in next; rep from * across until 3 sts remain, sk 1, tr in last 2. (30 (30, 30, 31, 31) (32, 32, 33) tr V-sts; 4 tr)
Rows 2-25 (27, 30, 33, 36) (40, 44, 48): Turn, beg tr in first, tr in next, tr V-st in each V-st across until 2 sts remain, tr in last 2.
Fasten off a 40” tail to seam the front after blocking. Continue to Sleeves.
Sleeves
On RS, attach yarn to bottom of arm opening.
Rnd 1: Ch 2, work 62 (62, 62, 64, 64) (66, 68, 70) dc around opening, join with a sl st. (62 (62, 62, 64, 64) (66, 68, 70) dc)
Rnd 2: Ch 1, turn, sc in first, sc in each st around, join with a sl st.
Rnd 3: Ch 2, turn, dc in first, dc in each st around, join with a sl st.
Rnd 4: Repeat Rnd 2.
Rnds 5-70 or to desired length: Rep Rnds 3-4. Optional shaping: After the sleeve length reaches the elbow, 1 sc2tog decrease can be worked in every other sc round.
Fasten off and wet block top. After wet blocked continue to finishing instructions.
Finishing
Front Twist Seam
Lay top flat with front facing, pick up front V-st section, to form the twist, bring the bottom corner up to the top corner of Row 1 from the back and bring the top V-st corner down to the bottom edge of Row 1 of back. Pin in place with stitch markers. Thread the 40” tail through a yarn needle, seam the last V-st row to Row 1 of back section.
Neck Shaping
With back RS facing, join yarn at top edge where Row 1 of Back is.
Row 1: Work evenly along top edge, ch 1, place a sc in each sc row edge and work a sc2tog along each dc row edge, sl st in same sp as last st. (57 (63, 69, 75, 81) (87, 93, 101) sc)
Row 2: Ch 1, turn, sk the sl st, sl st in next, *sc in next 2, sc2tog; rep across until no more sts remain or 2 sts remain, if 0 st remains – sl st in the side of the previous row; if 2 sts remain – sc2tog, sl st in the side of the previous row. 42 (48, 51, 57, 60) (66, 69, 75) sc)
Row 3: Ch 1, sk the sl st, sl st in first, sc in each st across until 1 remains before the sl st, sl st in last. 40 (46, 49, 55, 58) (64, 67, 73) sc)
Fasten off and weave in remaining ends.
Just curious, I am a subscriber and I can’t find any schematic for this sweater. Are there some?
Hi there, this particular pattern does not have a schematic. – Nicola, Editor
I would like to see schematics for the crochet patterns, similar to what you would find with most knitting patterns. I find them very helpful.
Hi there, this particular pattern does not have a schematic. – Nicola, Editor