
Take a regular summer tank from ‘blah’ to ‘WOW’ with these elegant rose motifs crocheted with 100% Egyptian cotton. Crochet motifs are quite popular in the fashion world when paired with fabric so now’s your chance to try it for yourself!
Skill Level: Intermediate
Size: S/M (L/XL)
Gauge: Each motif – 3½” across middle
Materials
Yarn:
![]() Nazli Gelin Garden 3 Crochet Thread (100% Egyptian Cotton; 136 yards [124 meters]/ 50 grams): 300-19 Light Tan, 3 balls
Nazli Gelin Garden 3 Crochet Thread (100% Egyptian Cotton; 136 yards [124 meters]/ 50 grams): 300-19 Light Tan, 3 balls
Hook: Size F/5 (3.75 mm)
Notions: Sewing needle; matching thread; straight pins; dress form; tank top
Special Stitches
Dc 2 ch-5 sps tog: Yo, (insert hook in next ch-5 sp) twice, yo, draw up a lp through both ch-5 sps, (yo, pull through 2 lps on hook) twice.
Low sl st: Insert hook in st 2 rows below, yo, pull through lp on hook (in this project, all Low Sl Sts will be worked in dcs below the row of hdcs)
Pattern Notes
Motifs are joined as you go and then edged. Lastly the motifs are sewn to a bought tank top.
Pattern
Flower Motif [make 10 (11)]
Rnd 1: Work 6 sc in an adjustable ring
Rnd 2: Working in the front loop only, (sl st in next st, ch 1, dc in same st, ch 1, sl st in same st) around – 6 tiny petals.
Rnd 3: Now working in unused back loops of previous rnd, sl st in next st, ch 4 (counts as first dc and first ch-2 sp), (dc in next st, ch 2) around, join with sl st to 2nd ch of beg ch-4 – 6 ch-2 sps, 6 dcs.
Rnd 4: (Sc, 3 dc, sc) in each ch-2 sp around – 6 petals.
Rnd 5: Sl st in first sc of Rnd 4, working behind petals just made, ch 2, sl st in center of next petal, ch 6, (dc in center of next petal, working around ch-2 length from Rnd 3, ch 4) around, join with sl st to 2nd ch of beg ch-6.
Rnd 6: (Sc, hdc, 3 dc, hdc, sc) in each ch-4 sp around – 6 larger petals.
Rnd 7: Working behind petals just made, ch 3, (sl st in center of next petal, working around ch-4 length of Rnd 5, ch 6) around, join with sl st in first sl st.
Rnd 8: (Sl st in next ch-6 sp, ch 2, 9 dc, ch 2, sl st in same sp) around, join with sl st in first sl st – 6 larger petals.
Rnd 9: Working behind petals, (ch 7, sl st in center of next petal, ch 7, sl st in sp between current petal and next petal) around, ending with ch 3, tr in first sl st – 12 ch-7 sps.
Rnd 10 (First Motif Only): Ch 1, sc in same sp, (ch 5, sc in next sp) around – 12 ch-5 sps. Fasten off.
Size S/M only
Motifs 2-9
Rnd 10: Ch 1, sc in same sp, (ch 5, sc in next sp) twice, ch 3, sc in ch-5 sp in adjacent motif (see Diagram), ch 3, sc in next ch-sp on working motif, ch 3, sc in next ch-sp on adjacent motif, ch 3, sc in next ch-sp on current motif, (ch 5, sc in next ch-5 sp) 8 times around, ending with sl st in first sc.
Fasten off.
Size L/XL only
Motifs 2-10
Rnd 10: Ch 1, sc in same sp, (ch 5, sc in next sp) twice, ch 3, sc in ch-5 sp in adjacent motif (see Diagram), ch 3, sc in next ch-sp on working motif, ch 3, sc in next ch-sp on adjacent motif, ch 3, sc in next ch-sp on current motif, (ch 5, sc in next ch-5 sp) 8 times around, ending with sl st in first sc.
Fasten off.
All Sizes
Last Motif
Rnd 10: Ch 1, sc in same sp, (ch 5, sc in next sp) twice, ch 3, sc in ch-5 sp in adjacent motif (see Diagram), ch 3, sc in next ch-sp on working motif, ch 3, sc in next ch-sp on adjacent motif, ch 3, sc in next ch-sp on current motif, (ch 5, sc in next ch-5 sp) 4 times, (ch 3, sc in next ch-5 sp on adjacent motif, ch 3, sc in next ch-5 sp on current motif) twice, (ch 5, sc in next ch-5 sp) twice, ending with sl st in first sc.
Fasten off.
Tips for Altering Size
There are other ways to modify the size of the motif piece.
Try using a larger hook about a size or two – this will make each motif slightly larger but the steps and stitches in the instructions would not change.
Another way would be to add a row of ch-5 sps to the ends of the motifs that fall at the shoulders. Do not join shoulder motifs as instructed in pattern but leave un-joined. Then join using Zigzag Join method (see Diagram 2). Each chain length can vary depending on how much extra length you need. Would need to make a few changes to the top and bottom edgings (as shown in Diagram 2).
Top Edging
Rnd 1: Join with sl st to ch-5 sp (E in Diagram), ch 7, dc in next ch-5 sp, *[ch 4, dc in next 2 ch-5 sps together (F and G in Diagram), (ch 4, dc in next ch-5 sp) twice] 9 (10) times, ch 4, dc in next 2 ch-5 sps together, ch 4, sl st to 3rd ch of starting ch-7.
Rnd 2: Sl st in first ch- sp, ch 1, (sc, hdc, 3 dc, hdc, sc) in each ch-4 sp around, join with sl st to first sc of rnd.
Fasten off.
Bottom Edging
Rnd 1: Join with sl st in ch-5 sp (H in Diagram), ch 7, [tr in each of next 2 ch-5 sps (D and B in Diagram), (ch 4, dc in next ch-5 sp) 4 times, ch 4] around, ending with sl st in 3rd ch of starting ch 7.
Rnd 2: Ch 2, work 5 hdc in each ch-4 sp, 1 hdc in between all trs, 1 hdc in each dc around, ending with sl st to top of starting ch-2.
Rnd 3: Sl st in next st, ch 1, hdc in same st, dc in each of next 3 sts, hdc in next st, (Low Sl St in next dc, hdc in next st, dc in each of next 3 sts, hdc in next st) around, ending with Low Sl St in last dc.
Finishing
Steam block all motifs and let dry completely.
Assembly
Attaching motifs to Tank Top
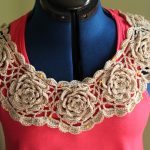
Photo 1: Using a dress form (or model), pin motifs to Tank Top making sure to center the 5 motifs across front.
Note: Size L/XL will still have 5 motifs across front but will also have ½ a motif added on each end at the shoulders.
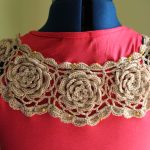
Photo 2: Repeat pinning on the back of Tank Top.
Turn Top right side in and place back on dress form.
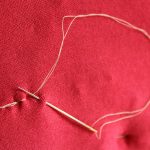
Photo 3: Using a sewing needle and thread that matches the motifs, sew motifs to Tank Top working through scallop edging, making sure sewing thread does not show on right side of garment.
Use straight stitch shown in photo.
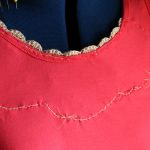
Photo 4: Here you can see motifs fully sewn to front of Tank Top (from wrong side).
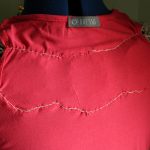
Photo 5: Repeat sewing motifs on the back of Tank Top.

Photo 6: Cut Tank Top fabric about 1” above side stitching.
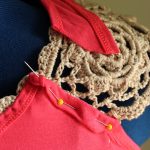
Photo 7: – Fold edge down twice toward front of Top, pin and sew in place.
Repeat cutting, folding, and sewing on other side of front.
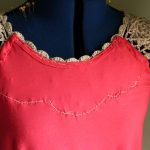
Photo 8: Front of Top shown completed (from wrong side).

Photo 9: Close up of edging of cut side, sewn with whipstitch around all edges of folded fabric.
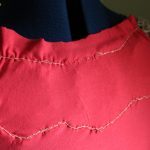
Photo 10: Repeat fabric cutting on back of Tank Top.

Photo 11: Cut 3/8” slits along cut edge since fabric is on a slight curve.
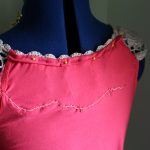
Photo 12: Fold over fabric twice downward toward motifs.
Pin in place and sew with whipstitch. 


