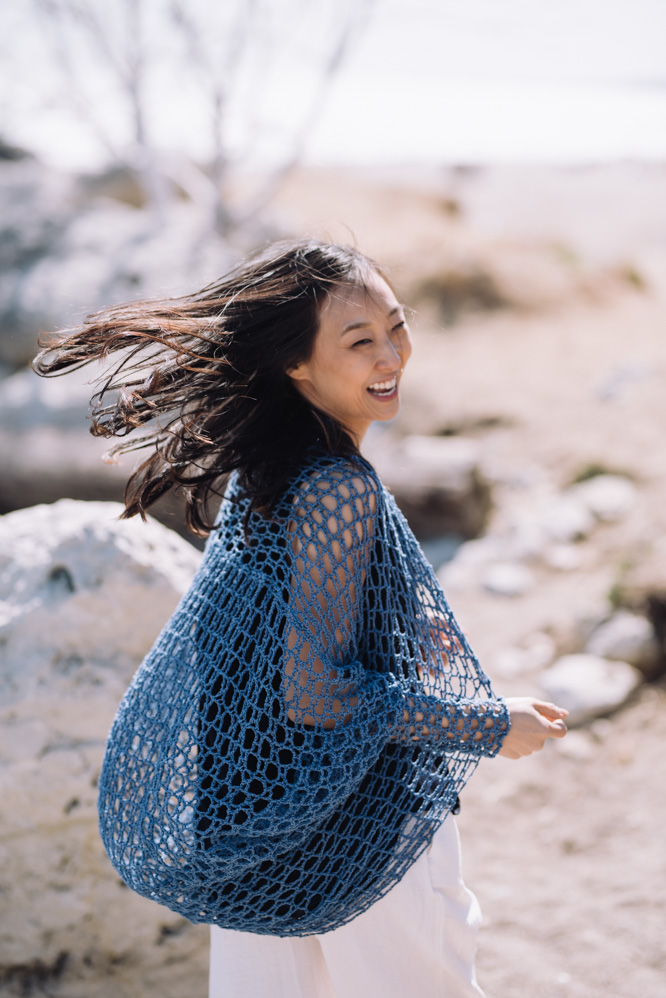
A cocoon cardigan need not be a warm accessory, simply a colorful or visually interesting topper swimwear and summer outfits. The beauty of the piece is the way in which the simple rectangle shape is folded and seamed then worked in the round to complete the front and cuffs.
Time: Weekend Project
Skill Level: Easy
Size: One size fits most
40” from elbow to elbow x 21”, 62” from wrist to wrist
Gauge: 20 dc and 12 rows = 4” [10 cm] in dc
Materials
 Yarn: Fibra Natura Flax (100% linen; 137 yards [125 meters]/50 grams): 103 Regatta (8 hanks)
Hook/Needles: US size E/4 (3.5 mm)
Notions: Markers, removable markers, tapestry needle
Pattern Notes
The bodice is worked side to side in pattern stitch to form a rectangle. The rectangle is then folded and seamed to form armholes. A band is then worked around the bodice opening in the round in pattern stitch to desired width of front. Cuffs are picked up in the round and worked to the desired length.
For a wider bodice, increase the number of rows crocheted.
For a longer bodice, increase the length of the starting chain in multiples of 12, the number of stitches in the pattern repeat.
Pattern
Ch 131.
Row 1: Dc in 4th ch from hook (skipped 3 ch count as first dc), *ch 2, sk next 2 ch, hdc in next ch, ch 2, sk next 2 ch, dc in next ch, ch 5, sk next 5 ch, dc in next ch, rep from * to last 7 ch, ch 2, sk next 2 ch, hdc in next ch, ch 2, sk next 2 ch, dc in last 2 ch, turn. (10 ch-5 sps)
Row 2: Ch 3 (counts as dc throughout), dc in next dc, *ch 5, sk next 5 sts, dc in next dc, ch 2, hdc in next ch-5 sp, ch 2, dc in next dc, rep from * to last 7 sts, ch 5, sk next 5 sts, dc in next dc, dc in top tch, turn. (11 ch-5 sps)
Row 3: Ch 3, dc in next dc, *ch 2, hdc in next ch-5 sp, ch 2, dc in next dc, ch 5, sk next 5 sts, dc in next dc, rep from * to last 7 sts, ch 2, hdc in next ch-5 sp, ch 2, dc in next dc below, dc in top of tch, turn. (10 ch-5 sps)
Rows 4–101: Rep Rows 2-3
Fasten off, leaving a 3’ tail. Place marker (pm) in last stitch of bodice.
Seam armholes
With RS facing and piece positioned horizontally in front of you with last row on the right, fold the top right and bottom right corners towards each other. Using the 3’ tail, slip stitch to join first and last stitch of this row, then continuing along armhole edge working through both thicknesses, work sl st in next 20 sts (ch count as sts), ending in a dc before a ch-5 sp. Fasten off, leaving a 3” tail. Pm in last st of this seam for the starting point when working the right cuff.
Repeat seaming for top left and bottom left corners to form the second armhole. Pm in last st of this seam for the starting point when working the left cuff.
Border
With RS facing, join yarn in marked last st of bodice.
Rnd 1: Ch 1, work evenly distributed 51 sc along first half of last row, 102 sc along selvedge edge, 102 sc along back of starting ch, 102 sc along second selvage edge, and 51 sc along rem half of last row, sl st in first st to join. (408 sts)
Rnd 2: Ch 8 (counts as dc, ch 5), sk next 5 sc, dc in next sc, *ch 2, sk next 2 sc, hdc in next sc, ch 2, sk next 2 sc, dc in next sc, ch 5, sk next 5 sc, dc in next sc, rep from * around to last 5 sc, ch 2, sk next 2 sc, hdc in next sc, ch 2, sk last 2 sc, sl st in 3rd ch of beg ch 8 to join.
Rnd 3: Ch 5 (counts as dc, ch 2), hdc in next ch-8 sp, ch 2, dc in next dc, *ch 5, sk next 5 sts, dc in next dc, ch 2, hdc in next ch-5 sp, ch 2, dc in next dc, rep from * around to last 5 sts, ch 5, sk last 5 sts, sl st in 3rd ch of beg ch 5 to join.
Rnd 4: Ch 8 (counts as dc, ch 5), dc in next dc, *ch 2, hdc in next ch-5 sp, ch 2, dc in next dc, ch 5, sk next 5 sts, dc in next dc, rep from * around to last ch-5 sp, ch 2, hdc in last ch-5 sp, ch 2, sl st in 3rd ch of beg ch 8 to join.
Rnds 5–35: Rep Rnds 3–4 fifteen times, then work Rnd 3 once more.
Fasten off.
Cuff
With RS facing, join yarn with sl st in marked st for starting point of right cuff.
Rnd 1: Ch 6, dc in next dc, *ch 2, hdc in next ch-5 sp, ch 2, dc in next dc, ch 5, dc in next dc, rep from * to last dc, dc in last dc, ch 2, sl st in 3rd ch of beg ch 6 to join, sl st in next 2 ch of beg ch 5 and in first dc of this rnd for new end of rnd.
Rnd 2: Ch 5 (counts as dc, ch 2), hdc in next ch-5 sp, ch 2, dc in next dc, *ch 5, sk next 5 sts, dc in next dc, ch 2, hdc in next ch-5 sp, ch 2, dc in next dc, rep from * around to last 5 sts, ch 5, sk last 5 sts, sl st in 3rd ch of beg ch 5 to join.
Rnd 3: Ch 8 (counts as dc, ch 5), dc in next dc, *ch 2, hdc in next ch-5 sp, ch 2, dc in next dc, ch 5, sk next 5 sts, dc in next dc, rep from * around to last ch-5 sp, ch 2, hdc in last ch-5 sp, ch 2, sl st in 3rd ch of beg ch 8 to join.
Rnds 4–11: Rep Rnds 2–3.
Rnd 12: Ch 5 (counts as dc, ch 2), hdc in next ch-5 sp, ch 2, dc in next dc, *ch 4, sk next 5 sts, dc in next dc, ch 2, hdc in next ch-5 sp, ch 2, dc in next dc, rep from * around to last 5 sts, ch 4, sk last 5 sts, sl st in 3rd ch of beg ch 5 to join.
Rnd 13: Ch 7 (counts as dc, ch 4), dc in next dc, *ch 2, hdc in next ch-4 sp, ch 2, dc in next dc, ch 4, sk next 5 sts, dc in next dc, rep from * around to last ch-4 sp, ch 2, hdc in last ch-4 sp, ch 2, sl st in 3rd ch of beg ch 7 to join.
Rnd 14: Ch 5 (counts as dc ch 2), hdc in next ch-4 sp, ch 2, dc in next dc, *ch 4, sk next 5 sts, dc in next dc, ch 2, hdc in next ch-4 sp, ch 2, dc in next dc, rep from * around to last 5 sts, ch 4, sk last 5 sts, sl st in 3rd ch of beg ch 5 to join.
Rnds 15-21: Rep Rnds 13-14 three times, then work Rnd 13 once more.
Rnd 22: Evenly crab st around cuff edge. Fasten Off.
Finishing
Wash per ball band instructions and hang to dry or dry on low in clothes dryer. Use iron to block piece.


Garbage. For people who can’t cope with a shaped garment pattern.
I’m a member here, so why don’t you post my opinion on this garment? I shall try again, as follows: (Or do you publish only positive comments? That’s pretty narrow, and makes for a boring set of comments.)
This “cocoon” is shapeless, as they all are, and not at all stylish. At least if it lay flat at the back, that might save it but then it wouldn’t be a cocoon anymore. What is the point of this article of clothing?
It seems to me that cocoons are the last gasp of designers running out of ideas, or they are trying to cater to crocheters & knitters who don’t have the smarts to follow instructions for shaped, recognizable garments. This is not a cardigan by any stretch of the imagination.
Is there a diagram somewhere that shows how to put this together? I am having trouble with seaming the armholes and how to set up the border.
Hello! I’ve reached out to the designer for advice and she or I will reply as soon as possible. Thanks! – Nicola, Editor
Hi Sheryll! Rosann has kindly put together a blog post on her website to help with assembly: https://firstbytedesigns.com/putting-it-all-together/
Happy crocheting! – Nicola, Editor