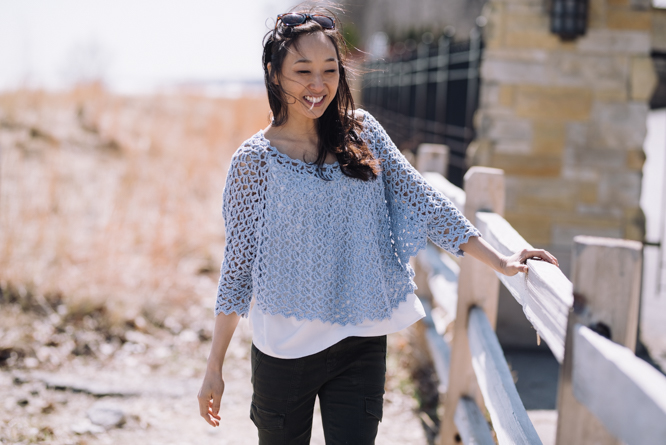
This lacy swoncho with three-quarter length sleeves is the perfect layer to slip over a summer outfit for a little warmth when the evening cools off or the air conditioning is too chilly. The lopsided lace stitch pattern is easy to learn and the increases are simple enough an adventurous beginner can tackle this project.
Time: Weekend Project
Skill Level: Intermediate
Size: Small (Medium, Large, XLarge, 2X),
US sizes 6/8 (10/12, 12/14, 14/16, 16/18)
Sized to fit approximate bust size 36 (38, 40, 42, 45)”
46.5 (48.5, 48.5, 50.5, 50.5)” wide from cuff to cuff, 17 (18, 18, 19, 19)” long from neckline to hem.
Shown in size Small
Gauge: 3 Shells and 5 rows = 4” [10 cm] in Lopsided Shell pattern
Materials
 Yarn: King Cole Finesse (77% cotton, 23% silk; 131 yards [120 meters]/50 grams):
#2815 Soft Blue (5 (6, 6, 8, 10) balls)
Hook/Needles: US size I/9 (5.5 mm)
Notions: Stitch markers in 3 colors, tapestry needle
Abbreviations
PM – Place Stitch Marker
Special Stitches
Beginning Increase Lopsided Shell Stitch (BegShl): (ch 5, 2 tr) in indicated st or sp
Lopsided Shell Stitch (Shl): (dc, ch 2, 2 tr) in indicated st or sp
Beginning Increase V-stitch (BegIncV): (ch 5, tr) in indicated st or sp
Increase V-stitch (IncV): (dc, ch 2, tr) in indicated st or sp
Pattern Notes
This project is started with a stacked rows foundation which is formed into a ring. Stitch markers are placed in the single crochet rows of the foundation. Then the body of the swoncho is worked into the sides of the foundation rows in the round. Work continues top down in turned rounds, then armholes are joined and sleeves are worked in the round from each armhole.
Stitch markers are very important for following this pattern. 6 markers in one color for regular increase points, 2 or 4 in different color for bust increase points, 2 in 3rd color for armhole markers.
Shell stitches are worked in ch-2 space of previous row Shell stitches. Increases are worked in 2 steps. Step 1: crochet a V-stitch in the marked space between the Shell stitches where they meet moving stitch marker up to ch-2 space of V-stitch. Step 2: In the next round Shell stitches are worked in each ch-2 space of both Shells and V-stitches.
Bust increases are written for A-B cup in size Small and Medium, B-C cup in size Large and XL and C+ cup in size 2X. Number of increases can be adjusted for larger or smaller bust as needed. If bust increases are changed, it will affect the placement for Armhole stitch markers.
If going to an A-B cup size in any of the larger sizes, use same st marker placement as instructed for size Large but stop bust increases in Rnd 8.
Pattern
Stacked Rows Foundation / Neckline
Row 1 (WS): Ch 2, sc in 2nd ch from hook.
Row 2 (RS): Ch 3, turn, 2 dc in sc.
Row 3: Ch 1, turn, sc in first dc.
Rows 4-48 [48, 52, 52, 52]: Rep Rows 2-3, ending with a Row 2, without twisting stacked rows sl st to bottom of Row 1 to form ring. (24 [24, 26, 26, 26] sc rows, 24 [24, 26, 26, 26] dc rows)
Body
Turn to work along straight edge of neckline ring with WS facing.
Place markers in foundation rows counting from first row as follows:
Sizes Small, Medium, Large Only
For regular increase points, PM in 1st, 9th, 17 (17, 19)th, 25 (25, 27)th, 33rd (33rd, 35th), and 41st (41st, 45th) sc row.
For bust increase points, PM in 21st (21st, 23rd) and 29th (29th, 31st) sc row. Remove after Rnd 4 (6, 8) of body.
Sizes XLarge, 2XL Only
For regular increase points, PM in 1st, 9th, 19th, 27th, 35th, and 45th sc row.
For bust increase points, PM in 15th, 23rd, 31st, and 39th sc row. Remove after Rnd 6 (10) of body.
All sizes
Rnd 1 (WS): Moving st markers up to ch-2 sp of Shl worked in marked foundation row, BegShl in same sc row as join, sk next dc row, *Shl in next sc row, sk next dc row, rep from * around through last sc row of neckline, sk last dc row, sl st to 3rd ch of beginning ch-5, turn. Move each st marker to sp before marked Shl. (24 [24, 26, 26, 26] Shls)
Rnd 2 (RS, Inc Vs): BegIncV in marked sp before first Shl, move st marker to ch-2 sp of BegIncV just made, *Shl in ch-2 sp of each Shl around through Shl before next st marker, IncV in marked sp, move st marker to ch-2 sp of IncV just made, rep from * around through IncV in last marked sp, Shl in each rem ch-2 sp through last Shl, sl st to 3rd ch of beginning ch-5, sl st loosely in next ch-2 sp, turn. (24 [24, 26, 26, 26] Shls, 8 [8, 8, 10, 10] IncVs)
Rnd 3: BegShl in same ch-2 sp, *Shl in each ch-2 sp around, moving up st markers to ch-2 sp of Shl worked in marked ch-2 sp, rep from * around through last ch-2 sp of rnd, sl st to 3rd ch of beginning ch-5. Move st markers to sp after marked Shl. (32 [32, 34, 36, 36] Shls)
Rnds 4–17 (19, 19, 21, 21): Rep Rnds 2-3. At end of last rnd, remove all regular increase markers. (76 [84, 88, 98, 106] Shls)
Rnd 18 (20, 20, 22, 22): Sl st loosely in next ch-2 sp, turn, BegShl in same ch-2 sp, Shl in each ch-2 sp around through last ch-2 sp of rnd, sl st to 3rd ch of beginning ch-5.
Counting from join in direction we’ll be working next rnd, PM in ch-2 sp of Shls 14 & 54 (15 & 60, 15 & 63, 16 & 71, 17 & 77).
Separate body and sleeves
Rnd 19 (21, 21, 23, 23) (WS): Sl st loosely in next ch-2 sp, turn, BegShl in same ch-2 sp, [Shl in each ch-2 sp around through marked ch-2 sp, sk next 8 (9, 10, 11, 12) Shls, Shl in ch-2 sp of next Shl] 2 times, Shl in each ch-2 sp around through last ch-2 sp of rnd, sl st to 3rd ch of beginning ch-5. Remove armhole st markers. (60 [66, 68, 76, 82] Shls)
If more body length is desired, rep Rnd 18 (20, 20, 22, 22) in multiples of 2 before moving on to Body border.
Body border
Next rnd (RS): Turn, sc in next 2 tr, *(sc, ch 2, 2 sc) in next ch-2 sp, sc2tog over next tr and dc, sc in next tr, rep from * around to last Shl, sc2tog over next tr and dc, sc in next tr, sc in last tr, sl st to first sc of rnd. Fasten off. (242 [266, 274, 306, 330] sc, 60 [66, 68, 76, 82] ch-2 sp, 59 [65, 67, 75, 81] sc2tog)
Sleeves
Rnd 1: With RS of Body facing, attach yarn with sl st to close gap at bottom of armhole by marking a sl st that joins sps before and after armhole Shls at bottom of armhole, sl st loosely in next ch-2 sp of first Shl of armhole opening, turn so WS of Body is facing, BegShl in same ch-2 sp, *Shl in ch-2 sp of each rem Shl around armhole opening, sl st to 3rd ch of beginning ch-5. (8 [9, 10, 11, 12] Shls)
Rnds 2-5: Sl st loosely in next ch-2 sp, turn, BegShl in same ch-2 sp, *Shl in each ch-2 sp around, rep from * around through last ch-2 sp of rnd, sl st to 3rd ch of beginning ch-5.
Cuff border
Rnd 6: Turn, sc in next 2 tr, *(sc, ch 2, 2 sc) in next ch-2 sp, ** sc2tog over next tr and dc, sc in next tr, rep from * around to last Shl, sc2tog over next tr and dc, sc in next tr, sc in last tr, sl st to first sc of rnd. Fasten off. (34 [38, 42, 46, 50] sc, 8 [9, 10, 11, 12] ch-2 sp, 7 [8, 9, 10, 11] sc2tog)
Repeat for 2nd sleeve.
Finishing
Gently block to define points at cuffs and hem. Weave in all ends.


How can I make this about knee length and how do I calculate the yarn needed for this increase.
Hi Charlotte! Unfortunately, you will need to experiment to figure this out on your own as it would take us/the designer hours of work to calculate and troubleshoot as it would be an entirely different pattern at that point. I would venture to say that you would probably need at least double or triple the amount of yarn, but I cannot be certain of this. Best of luck! – Nicola, Editor
Where do I find the tutorial?
Hi Donna! We don’t have a tutorial for this pattern yet, but, this designer has some helpful tips and a video for her other pattern that has a similar construction: https://www.ilikecrochet.com/magazine/crochet-top-patterns/sierra-swoncho/
Hope this helps! – Nicola, Editor