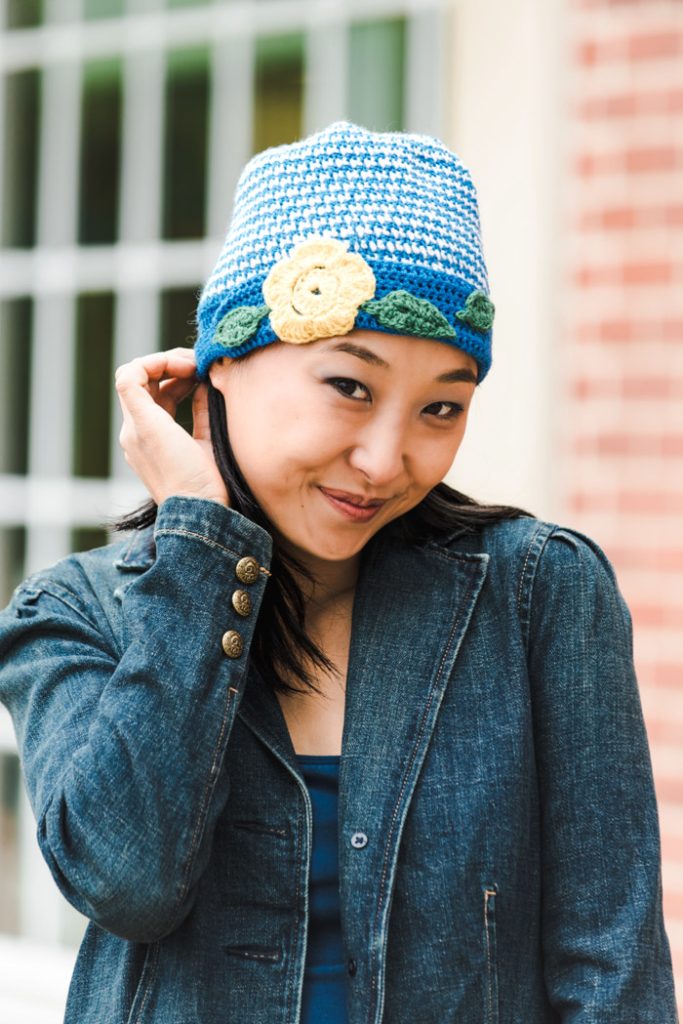
The Flawless in Fleurs Cloche is a stunning, classic design that beautifully combines timeless elegance with a burst of cheerful color. Crafted with a charming blue and white checkered pattern, this hat exudes a vintage feel that pairs effortlessly with both casual and dressy outfits. The folded-up brim adds a structured, yet playful touch to its overall silhouette, making it the perfect accessory to elevate your spring or summer wardrobe.
The bright yellow flower adorning the side of the cloche is the perfect finishing touch, adding a vibrant pop of color and a touch of femininity. Whether you’re strolling through a garden or attending a picnic, this hat will bring both style and sunshine to any occasion.
Skill Level: Easy
Size: 22” finished circumference
Gauge: 20 sts and 12 rows = 4” [10 cm] in stitch pattern after wet blocking.
Materials
 Yarn: Knit Picks Palette (100% Peruvian Highland Wool; 231 yards [211 meters]/50 grams): 23722 Blue (MC,1 ball), 23728 White (C1, 1 ball), 24585 Grass (C2, 1 ball), 25086 Safflower (C3, 1 ball)
Hook: US size D/3 (3.25 mm); US size F/5 (3.75 mm)
Notions: Removable markers; tapestry needle
Special Stitches
Dec: Work the next sc and dc stitches together, maintaining the established stitch pattern.
Dtr: (Yo) 3 times, insert hook in st indicated, yo, pull up a lp, (yo, pull through 2 lps) 4 times.
Flower
With larger hook and C3, ch 5, join with sl st to form ring.
Rnd 1: Ch 2 (counts as dc), work 14 dc in ring, sl st to beg ch.
Rnd 2: *Ch 4, sk next 2 dc, sl st in next dc; rep from * 4 more times, working last sl st in base of beg ch.
Rnd 3: *(Dc, 4 tr, dtr, dc) in next sp; rep from * around, join with sl st to first dc.
Fasten off leaving a long enough tail to sew Flower to Brim.
Leaf (make 3; 2 with larger hook and 1 with smaller hook)
With C2, ch 10.
Rnd 1: Working in back loops only, sk 3 ch, 3 dc in next ch, dc in next 3 ch, hdc in next ch, sc in next ch, sl st in next ch, ch 2, sl st in 2nd ch from hook (point made), working in opposite side of beg ch in front loops only, sl st in next ch, sc in next ch, hdc in next st, dc in next 3 sts, 3 dc in next ch, join with sl st to top of beg ch-3, ch 4, sl st in 2nd ch from hook, sl st in next 2 ch (stem made), sl st to next dc.
Fasten off, leaving an 8” tail.
Pattern Notes
The hat is worked in 2 colors in continuous rounds without joining from the bottom up to crown in the 2-color pattern to the crown.
The folded shaped brim is worked down from the foundation chain in the main color.
A flower with leaves are added for interest.
When changing colors, work st as normal, working last pull through of st with new color.
Pattern
With MC and smaller hook, fsc 111, join with sl st in first st to work in the rnd, taking care not to twist. Place marker to indicate beg of rnd – 110 sts.
Rnd 1: With MC, *dc in next st, sc in next st; rep from * around to end of rnd, changing to C1 in last st.
Rnd 2: With C1, *sc in next st, dc in next st; rep from * around to end of rnd, changing to MC in last st.
Rep Rnds 1-2 until piece meas 5” from beg edge, ending with C1.
Crown Decrease
Note: Maintain est stitch pattern and color sequence throughout.
Rnd 1 (Dec): With MC, *dec, work next 18 sts in patt, dec; rep from * 4 more times, changing to C1 in last st – 100 sts.
Rnd 2: Work even around, changing to MC in last st.
Rnd 3 (Dec): With MC, *dec, work next 16 sts in patt, dec; rep from * 4 more times, changing to C1 in last st – 90 sts.
Rnd 4: Work even around, changing to MC in last st.
Rnd 5 (Dec): With MC, *dec, work next 14 sts in patt, dec; rep from * 4 more times, changing to C1 in last st – 80 sts.
Rnd 6: Work even around, changing to MC in last st.
Rnd 7 (Dec): With MC, *dec, work next 12 sts in patt, dec; rep from * 4 more times, changing to C1 in last st – 70 sts.
Rnd 8: Work even around, changing to MC in last st.
Rnd 9 (Dec): With MC, *dec, work next 10 sts in patt, dec; rep from * 4 more times, changing to C1 in last st – 60 sts.
Rnd 9 (Dec): With C1, *dec, work next 8 sts in patt, dec; rep from * 4 more times, changing to MC in last st – 50 sts.
Rnd 10 (Dec): With MC, *dec, work next 6 sts in patt, dec; rep from * 4 more times, changing to C1 in last st – 40 sts.
Rnd 11 (Dec): With C1, *dec, work next 4 sts in patt, dec; rep from * 4 more times, changing to MC in last st – 30 sts.
Rnd 12 (Dec): With MC, *dec, work next 2 sts in patt, dec; rep from * 4 more times, changing to C1 in last st – 20 sts.
Rnd 13 (Dec): With C1, *dec, dec; rep from * 4 more times – 10 sts.
Break yarn, leaving an 8” tail.
Thread tapestry needle with yarn tail, weave through sts at top of Crown, pull to cinch top close.
Fasten off.
Brim
With MC and smaller hook, join yarn to beg foundation.
Rnd 1: Working in opposite end of foundation round, ch 2, dc in each st around to 1 st before end, dc2tog in last st and first st of rnd to join, place marker to indicate beg of rnd.
Working in continuous rnds, hdc in each st until Brim meas 1½”.
Next Rnd: Working in the front loops only, hdc in each st around.
Change to larger hook.
Next Rnd: Sc in next 10 sts, hdc in next 2 sts, dc in next 36 sts, hdc in next 6 sts, sc in each st to end of rnd.
Rep last rnd twice more.
Next Rnd: Sc in next 12 sts, dc in next 36 sts, hdc in next 6 sts, sc in each st to end of rnd.
Next Rnd: Sc in next 12 sts, dc in next 37 sts, hdc in next 5 sts, sc in each st to end of rnd.
Rep last rnd twice more
Next Rnd: Sl st in next 2 sts, dc in next 38 sts, hdc in next 4 sts, sl st in each st to end of rnd.
Fasten off.
Finishing
Weave in all ends. Block as desire.
Fold Brim, sew Flower and Leaves, using photo as a guide.


I’m delighted with this pattern, it’s so young and fresh. I will definitely be making this. Spring is on the way, what a great time to start this project!