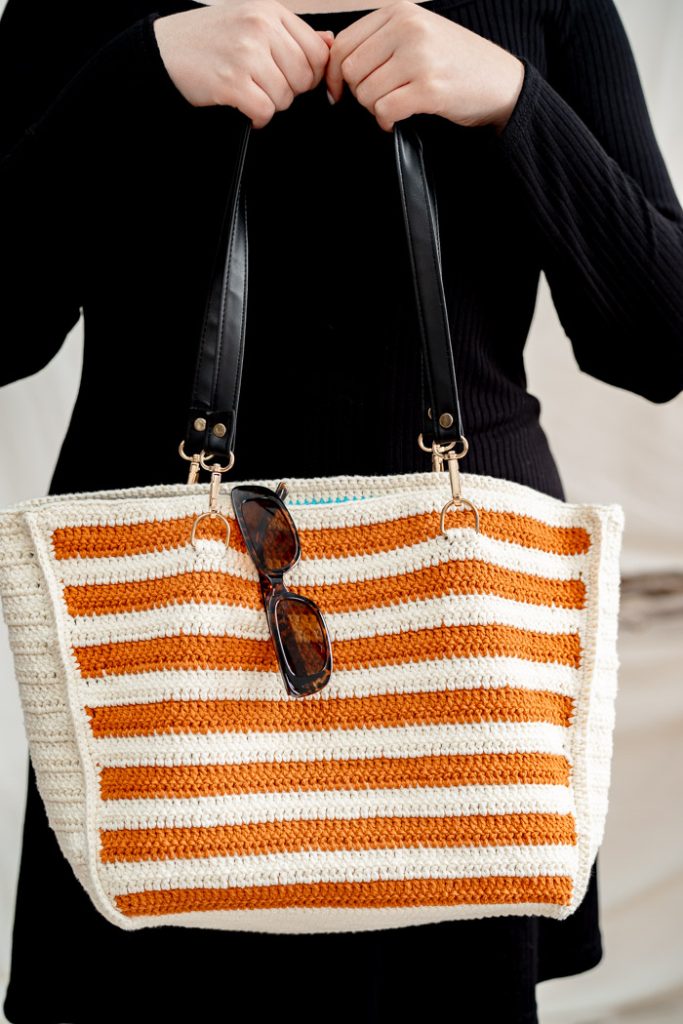
Urban Stripes Tote is a captivating bag that boasts a trapezoid silhouette, designed to widen at the top, creating a contemporary and eye-catching profile. The trapezoidal shape not only adds a distinctive flair but also enhances the bag’s functionality, providing ample room at the top for easy access to your belongings. The exterior showcases a symphony of vibrant stripes, offering a playful yet sophisticated aesthetic. Whether you’re strolling through the city streets or attending a social gathering, the “Urban Stripes Tote” effortlessly complements your ensemble, making a bold statement in the world of contemporary fashion.
Time: 2 weeks Project
Skill Level: Intermediate
SIZES: Width: 16” at top, 12” at bottom, Height: 10.5 “, Depth: 5.5”
Gauge: 19 sts and 10 rows = 4” [10 cm] in dc
Materials
 Yarn: Kotton by Magic Needles, 4 ply (100% Cotton; 415 yards [380 meters] / 5.3 ounces [150 grams]): 16L Cream (MC, 2 skeins), 52 peach brown (CC1, 1 skein), 28 Sky Blue (CC2, 1 skein),
Hook: US size D/3, 3.25 mm
Notions: 4 D-rings (1”), 2 faux leather straps (22” long) with attached lobster clasps, stitch markers, tapestry needle, measuring tape, pair of scissors, PVA glue, blocking mat and pins.
Pattern Notes
- The pattern is worked holding 2 strands of sport weight yarn together. Instead, you can also use single strand of worsted weight yarn.
- When you obtain the gauge, make sure your crochet fabric is sufficiently stiff. If it is not stiff enough, try using thicker yarn.
- The base of the bag is worked in continuous spiral rounds, without turning. Use 4 st markers to indicate corners. Use a different color stitch marker or a piece of scrap yarn to indicate the first stitch of each round.
- Ch-1 does not count as a stitch. Pull up beg ch-1 a little bit and then start working dc rows.
- When changing colors, start the stitch as normal, but stop before the last yarn over. Pick up the new color and finish the stitch. Do not pull much to avoid tension along the edges.
- Do not fasten off the yarn after color change, carry it along the edge.
- Stiffening the bag panels with PVA glue solution is highly recommended and it is necessary to retain proper bag shape. Also place a 11” × 5” piece of a thick, fabric covered art board/cardboard at bottom, to keep the base in shape and offer stability while using.
- D-ring attachments can be skipped if you want to crochet straps instead of using leather straps.
Pattern
Base
With MC, ch 30
Round 1: 2 sc in 2nd ch from the hook, pm in 2nd sc, sc in each ch to last ch, 3 sc in last ch, pm in first and third sc of 3 sc just made, rotate to work opposite side of starting ch, sc in each ch across, pm in last sc. Do NOT join and work in continuous spiral. (60 sts)
From now onwards, move markers up as you work, to the centre st of 3 sts placed in single st. St count will increase by 8 every round.
Round 2: Sc in next st, *3 sc in marked st, sc in each st to marked st, repeat from * 2 more times, 3 sc in last marked st, sc in each st to last st. (68 sts)
Round 3-14: *Sc in each st to marked st, 3 sc in marked st, repeat from * 3 more times, sc in rem sts. (164 sts)
After last round, add sc in each st to next marked st, sl st into marked st. This sl st does NOT count as a stitch. You can mark this sl st to avoid working in it.
Continue to front panel 1 without fastening off.
Front Panel
Counting the marked sc you just slip stitched into as a first st, your other markers should be in 55th, 83rd and 137th st. Keep first and third markers in place, and move 2nd and 4th markers to next sts i.e. in 56th and 138th st.
Row 1 (RS): Ch 1, 2 dc in same st, dc in each of next 53 sts, 2 dc in next st. (57 sts)
Your 2nd st marker should be in the next stitch of previous row.
Change to CC1. From now onwards, change MC and CC alternatively, every other row i.e. 2 rows are worked with each color alternatively.
Row 2-3: Ch 1, turn, dc in each st across.
Change to MC.
Row 4: Ch 1, turn, 2 dc in first st, dc in each st to last st, 2 dc in last st. (59 sts)
Row 5-24: Rep last 3 rows 6 more times, then rep row 2-3 one more time. (71 sts)
Row 25: Ch 1, turn, pm in 20th st from right and 23rd st from left, 2 dc in first st, dc in each st to marked st, hold the D ring flat metal edge along the 4 sts from previous row, work 4 dc over the D ring and the 4 sts from previous row, dc in each st to next marked st, attach the 2nd D ring in a similar manner, dc in each st to last st, 2 dc in last st. (73 sts)
Note: You can work fewer or more sts over D rings depending on their size. Make sure that both D rings have same number of sts (approx. 18-21 sts) from both the edges.
D-rings can also be attached when crocheting the last row, depending on your preference.
Row 26-28: Rep row 2-4. (75 sts)
Side Panel 1
Side panels are worked with MC only. Right side facing, join MC yarn to the next marked st (56th st).
Row 1 (RS): Ch 1, dc2tog over 2 sts, dc in each of next 23 sts, dc2tog over next 2 sts. (25 sts)
Your 3rd st marker should be in the next stitch.
Row 2-3: Ch 1, turn, dc in each st across.
Row 4: Ch 1, turn, dc2tog over 2 sts, dc in each st to 1 st before last st, dc2tog over last 2 sts. (23 sts)
Row 5-28: Rep last 3 rows 8 more times. (7 sts)
Back Panel
Right side facing, join MC yarn to the third marked st (83rd stitch). Follow the same instructions as for ‘Front panel’ and use CC2 instead of CC1.
Side Panel 2
Right side facing, join MC yarn to the fourth marked st (138th st). Follow the same instructions as for ‘Side panel 1’.
Weave in all the ends before proceeding to next sections.
Starching/Stiffening the panels
Block all the panels by starching them. It helps to hold the shape of the panels and stiffens the fabric. You can use any method of your choice, but PVA/white/craft glue works best for this project.
Make PVA solution by diluting PVA glue with some water in 1:1 proportion. Spray the solution all over the panels until fully saturated OR dip the panels in the solution for some time. Squeeze out the excess with hands. Then place them on blocking mat and pin them in place. Make sure that opposite panels have exactly same size and all panels have exactly same height while pinning. Allow them to dry completely.
Joining the panels together
Note: You can use a smaller and pointier hook for this step to make it easier to pass through stiff fabric.
Right side facing, join MC yarn to the left corner of top edge of any panel. Add 56 sc evenly across the panel edge (add 2 sc across each dc row). Now without fastening off, work 56 sc evenly across the next panel edge, from bottom up. Ch 1, turn, working from right side and through both sc rows, sc in each st across. First stitch might be a little tricky to crochet. (56 sts)
Fasten off.
Follow the same instructions and join other panels together.
Top Edge
Right side facing, join MC yarn to any joint.
Row 1 (RS): Ch 1, sc in each st, at the same time, add 2 sc across each joint. Join with sl st. (172 sts)
Fasten off.
Finishing
Weave in ends. Join leather straps to the D rings, avoiding twisting. Place a 11” × 5” piece of a thick, fabric covered art board/cardboard at bottom, to keep the base in shape and offer stability while using.


can i print it?