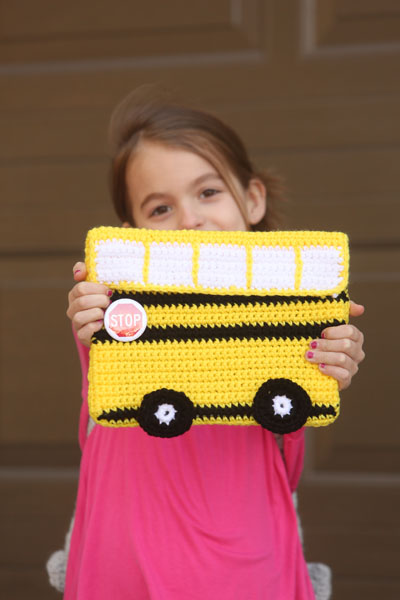
With many kids using iPads at school, this case will keep an iPad safe from scratches while looking fun. Velcro keeps the iPad from slipping out and there is even an opening to plug the charger in.
Skill Level: Easy
Size: Fits iPad 2 and up.
Gauge: 4 rows= 1”
Materials
Yarn:
![]() Red Heart Super Saver (100% Acrylic; 364 yards [333 meters]/198 grams): 0324 Bright Yellow (MC), 1 skein; 0311 White (C1), 1 skein; 0312 Black (C2), 1 skein
Red Heart Super Saver (100% Acrylic; 364 yards [333 meters]/198 grams): 0324 Bright Yellow (MC), 1 skein; 0311 White (C1), 1 skein; 0312 Black (C2), 1 skein
Hook: US size H/8 (5.0 mm)
Notions: One 1.5 pinback Stop sign (purchased on Etsy), 3/4” white sew-on hook and loop Velcro, 10” of hook, 10” of eye, white sewing thread, sewing needle and tapestry needle.
Special Stitches
Surface stitch: Insert hook from front to back in desired location on fabric. Grab yarn to be used with hook and bring through designed space. Insert hook into next space. From behind, grab yarn, pull through yarn and insert hook into next designed space. Continue in this manner from bottom to top.
Pattern
Front
With C2, ch 37.
Row 1: Sc in 2nd ch from hook and each chain across, changing to MC in last st, turn and fasten off C2 – 36 sc.
Rows 2: Ch 1, sc in each sc across, turn.
Rows 3-13: Repeat Row 2.
Row 14: Ch 1, sc across to last sc, changing to C2 in last sc, turn and fasten off MC.
Row 15: Ch 1, sc across, turn
Row 16: Ch 1, sc across, changing to MC at end of row, turn.
Rows 17-19: Repeat Row 2.
Row 20: Ch 1, sc across, changing to C2 in last sc, turn and fasten off MC.
Row 21: Ch 1, sc across, turn.
Row 22: Ch1, sc across, changing to MC in last sc, turn and fasten off C2.
Rows 23-32: Repeat Row 2. At end of Row 32, do not fasten off. Ch 1, sc in same sp, sc in each end of rows with 2 sc in first ch of beg-ch and each ch across with 2 sc in corner. Sc in each end of rows with 2 sc in corner and sc across Row 32, end with sc in same sp as first sc, join in first sc. Fasten off.
Back
With MC, ch 37.
Row 1: Sc in 2nd ch from hook and each ch across, turn – 36 sc.
Row 2: Ch 1, sc in each sc across, turn.
Rows 3-35: Repeat Row 2.
Row 36: Ch 1, sc in each sc across, changing to C1 in last sc, turn and fasten off MC.
Rows 37-43: Repeat Row 2. Do not Fasten off or turn at end of Row 43. Ch 1, and working in end of rows, sc in edge of each row, work 2 sc at beg of ch 37, sc in each ch across, with 2 sc in last ch. Working upward, sc in each end of row, 2 sc in beg of Row 43, sc across ending with sc in beg sc, join in first sc. Fasten off.
Wheels
With C1, ch 3. Join with sl st in first ch to form ring.
Rnd 1: Ch 1 (does not count as first sc), sc in same sp, work 7 sc in ring, join in first sc – 8 sc. Fasten off C1
Rnd 2: Join C2 with slip st in any sc of Rnd 1, ch 1, 2 sc in same sp, 2 sc in each sc around, join in first sc – 16 sc.
Rnd 3: Ch 1, *2 sc in same st, sc in next st; repeat from * around, join in first sc – 24 sc.
Finishing
With MC, surface stitch ‘windows’ 2” apart. Each window bar has 6 loops.
Sew Hook part of Velcro to inner top edge of flap between Rows 41-43.
Sew Loop part of Velcro to Front of cover between Rows 24-26.
Sew Wheels along center C2 edge of bottom Front, 2 ¼” apart.
With wrong sides tog, place last row of Front to Row 35 of Back, with MC and starting on left side, whipstitch around, ending last stitch at beginning of C2 stripe on Bus. Fasten off. (This will be the opening for plug in for charger)
With MC, begin whip stitching after second C2 stripe. Fasten off at end of Row 35.
Place Stop Sign pin on left side between C2 stripes.


