


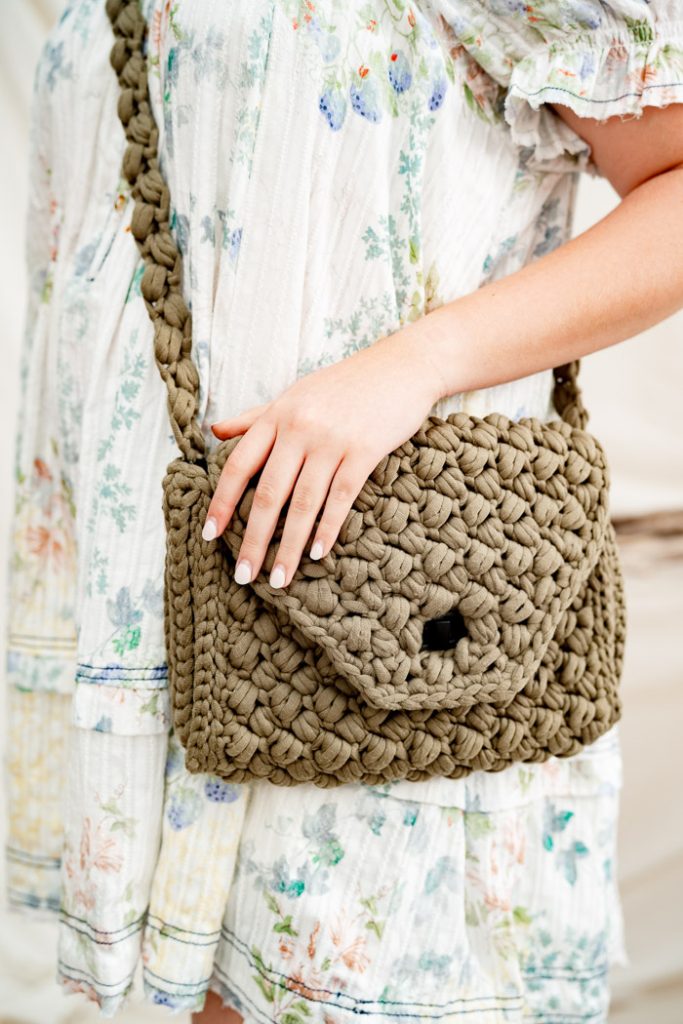
Discover the perfect blend of style and functionality with this woven-look crochet bag pattern. Designed for both beginners and seasoned crocheters, this pattern allows you to create a stunning bag in no time. The use of super bulky yarn ensures that the bag is not only quick to stitch but also durable and sturdy, making it ideal for everyday use. The highlight of this bag is its unique texture, achieved through the bean stitch. This stitch adds a delightful, woven-like appearance that sets this bag apart from ordinary crochet projects.
Time: Weekend Project
Skill Level: Intermediate
Size: 13 inches W x 9.5 inches H, excluding shoulder strap
Gauge: 4 bean st, ch-1 sts and 4 bean st rows = 4”
Materials
 Yarn: Lion Brand Cover Story Lazy Days Thick and Quick (100% polyester; 125 yards [114 meters]/250 grams): 172T olive (3 skeins)
Hook/Needles: US size M/15 (10 mm) crochet hook
Notions: National Nonwovens TOY002 wool felt, Black, 1/2 yard from www.nationalnonwovens.com
- Rectangular Bag Lock 1-1/2” (38mm) wide, Matte Black, 1 from emmalinebags.com
- 1/16”-wide flat-head screwdriver (Note: The type used for eye glass screw adjustments)
- White chalk pencil or tailor’s chalk, hand sewing needle and olive thread, black embroidery floss, removable markers, tapestry needle
Special Stitches
Bean stitch (bean st): Insert hook in indicated st or ch, yo, pull up lp, [yo, insert hook in same place, yo, pull up lp] twice, yo, draw through all 6 lps on hook, ch 1 to secure st.
Bean stitch decrease: Insert hook in indicated st or ch, yo, pull up lp, yo, sk next indicated ch or st, insert hook in next indicated st, yo, pull up lp, yo, insert hook in same st, yo, pull up lp, yo, draw through all 6 lps on hook.
Pattern Notes
Chain-1 at beginning of rows does not count as a stitch unless otherwise stated.
Weave in ends as work progresses.
Pattern
Bag
Row 1 (RS): Beg at bag front edge, ch 18, bean st (see Pattern Notes) in 2nd ch from hook, [sk next ch, bean st in next ch] across, turn. (9 bean sts)
Rows 2 – 4: Ch 1, sk first ch-1 sp, bean st in next bean st, [sk next ch-1 sp, bean st in next bean st] across, turn.
Row 5: Ch 1, sk first ch-1 sp, bean st in next bean st, [sk next ch-1 sp, bean st in next bean st] 3 times, sc in next ch-1 sp, sc in next bean st (closure tab placement made), ch 1, [sk next ch-1 sp, bean st in next bean st] across, turn. (8 bean sts, 2 sc)
Row 6: Ch 1, sk first ch-1 sp, bean st in next bean st, [sk next ch-1 sp, bean st in next bean st] 3 times, sk next sc, bean st in next sc, [sk next ch-1 sp, bean st in next bean st] across, turn. (9 bean sts)
Rows 7- 32: Rep row 2.
Row 33: Ch 2, sk first ch-1 sp, insert hook in first bean st, yo, pull up lp, yo, sk next ch-1 sp, insert hook in next bean st, yo, pull up lp, yo, insert hook in same bean st, yo, pull lp, yo, draw through all 6 lps on hook, ch 1 (first bean st dec made – see Special Stitches), [sk next ch-1 sp, bean st in next bean st] 5 times, sk next ch-1 sp, insert hook in next bean st, yo, pull lp lp, yo, sk next ch-1 sp, insert hook in next bean st, yo, pull up lp, yo, insert hook in same st, yo, pull lp, yo, draw through all 6 lps on hook, ch 1 (2nd bean st dec made), turn. (7 bean sts)
Row 34: Rep row 2.
Row 35: Ch 2, sk first ch-1 sp, insert hook in first bean st, yo, pull up lp, yo, sk next ch-1 sp, insert hook in next bean st, yo, pull up lp, yo, insert hook in same bean st, yo, pull lp, yo, draw through all 6 lps on hook, ch 1, [sk next ch-1 sp, bean st in next bean st] 3 times, sk next ch-1 sp, insert hook in next bean st, yo, pull lp lp, yo, sk next ch-1 sp, insert hook in next bean st, yo, pull up lp, yo, insert hook in same st, yo, pull lp, yo, draw through all 6 lps on hook, ch 1, turn. (5 bean sts)
Row 36: Rep row 2.
Row 37: Ch 1, sk first ch-1 sp, bean st in next bean st, sk next ch-1 sp, bean st in next bean st, ch 3 (closure opening made), sk next ch-1 sp, sk next bean st, sk next ch-1 sp, bean st in next bean st, sk next ch-1 sp, bean st in next bean st, turn. (4 bean sts)
Row 38: Loosely ch 1, place a st maker in ch just made, insert hook in first ch-1 sp, yo, pull up lp, yo, sk next bean st, sk next ch-1 sp, insert hook in next bean st, yo, pull up lp, yo, insert hook in same st, yo, pull up lp, yo, pull through all lps on hook, ch 1, insert hook in next ch, yo, pull up lp, yo, insert hook in next ch, yo, pull up lp, yo, insert hook in same ch, yo, pull up lp, yo, pull through all lps on hook, ch 1, sk next ch-1 sp, insert hook in next bean st, yo, pull up lp, yo, sk next ch-1, insert hook in next bean st, yo, pull up lp, yo, insert hook in same bean st, yo, pull up lp, yo, pull through all lps on hook, ch 1, turn. (3 bean sts)
Edging Rnd (RS): Tightly ch 1, 2 sc in first ch-1 sp, [sc in next bean st, sc in next ch-1 sp] twice, sc in next bean st, 2 sc in marked ch-1, *working in sps above and below bean sts along-side edge, sc in first sp, sk side edge of next bean st, [2 sc in sp below same bean st, sc in next sp, sk side edge of next bean st] * 18 times to rnd 1 of bag, working in opposite side of foundation chain, sc in first ch, sc in same ch, place a st marker in last sc made to mark left front edge of bag, sc in each of next 15 chs, sc in last ch, place a st marker in last sc made to mark right front edge of bag, sc in same ch, rep from * to * around, join to beg sc. Fasten off. With Bag facing, place a stitch marker in 36th st from marked stitch on each long side edge. (138 sc)
Bag Lining & Closure
- Cut a 2” long x 1 1/2” rectangle from felt. Center turn lock over rectangle and use marking or chalk pen to mark 3/8” long slits to correspond to tabs of turn lock. Use scissors to cut slits in felt.
- With Rnd 5 of Bag RS facing, insert tabs of turn lock between stitches of bag on each side of center 2 sc sts, insert tabs through felt rectangle and through metal washer. Press tabs firmly against washer to compress stitches and bend tabs outward toward short ends of washer. Use sewing needle and thread to whipstitch perimeter of felt rectangle to WS of bag.
- Place WS of bag onto felt, use chalk pencil to draw around bag. Cut felt approximately ¼ inch inside traced line.
- Use sewing needle and embroidery thread to stitch a chain st approximately 1/16” in from outer edges of felt lining and through WS of 3rd bar of Edging Rnd stitches to secure lining to bag.
- With Rnd 37 closure opening RS facing, insert front plate inside opening against felt lining, pushing yarn stitches to outer edge of front plate. Adjust front plate horizontally as needed to make sure each side edge of front plate is the same distance away from bag side edges. Press felt against WS of front plate to feel for center opening and screw holes. Use screw driver to poke a hole through felt on each side of front plate where screws are to be inserted. Press back plate against felt lining aligning screw holes with WS of front plate. Use screwdriver to tighten screws on each side of back plate opening to secure to front plate. Use needle and embroidery thread to work a chain st through felt and WS of bag very close to outer edges of back plate. Rep to work a 2nd rnd of chain sts 1/4” away from first rnd to secure felt to WS of bag and prevent stitches from shifting. Use scissors to trim away felt along front plate inside opening, being careful not to cut stitches of bag.
Shoulder Strap
Row 1: Ch 3, sc in 2nd ch from hook, sc in next ch, turn. (2 sc)
Row 2: Ch 1, sc in each st across.
Rows 3-4: Rep row 2 (one strap end tab made).
Row 5: Ch 1, sk first st, bean st in next st, turn. (1 bean st)
Row 6: Do not ch-1, sk first ch-1, bean st in next bean st, turn.
Rows 7- 60: Rep row 6 to desired length.
Row 61: Ch 1, sc in first ch-1, sc in next bean st, turn. (2 sc)
Rows 62-64: Rep row 2. (opposite strap end tab made). Fasten off.
Side panel and Lining (Make 2)
Row 1 (RS): Ch 17, working in back lps of chs, sc in 2nd ch and in each ch across, turn. (16 sc)
Row 2: Ch 1, working in front lps, sc in ea st across, turn.
Row 3: Working in back lps of sts, sc in each st across, turn.
Rows 4-5: Rep last 2 rows once. Do not turn at end of row 5.
Row 6 (Top edge): Ch 1, working across ends of rows, work 2 sc in first row, place a marker in first sc made, sc in each of next 3 rows, sc in last row, place a marker in last sc made, move lp from hook to stitch marker. (5 sc)
Assembly
- Cut two 2 3/4” x 7 1/2” rectangles from black felt.
- With top edge of Side Panel WS facing, place first 4 rows of one Strap end tab under top edge and use needle and olive thread to whipstitch strap end to WS of Side Panel. Rep to whipstitch opposite Strap end tab to 2nd Side Panel.
- Place felt on WS of Side Panel, and pin outer edges of lining approximately 1/4” in from outer edges of Side Panel, trimming felt where necessary. Use needle and embroidery thread to stitch a chain st through both layers around outer edges of lining. Repeat to stitch 2nd lining to WS of remaining Side Panel.
Finishing
Rnd 1: Ret lp from stitch marker to hook, with Side Panel and marked 37th st of Bag WS facing, sl st in same place where last sc of Side Panel was made and in marked st of Bag, *working through both layers in opposite side of Panel foundation ch and in top lps of bag sts, sl st in next 16 chs and sts, working in ends of rows of Panel bottom edge and in top lps of bag sts, work 2 sl st in first end of row and st, [sl st in end of next row and st] 3 times, 2 sl st in end of next row and st, working in top lps of Side Panel and Bag sts, sl st in next 16, sl st in next marked st. Fasten off. (41 sl sts)
Rnd 2: With marked front edge st of bag and 2nd Side Panel WS tog and Side Panel RS facing, ret lp to hook, rep from * of last rnd.