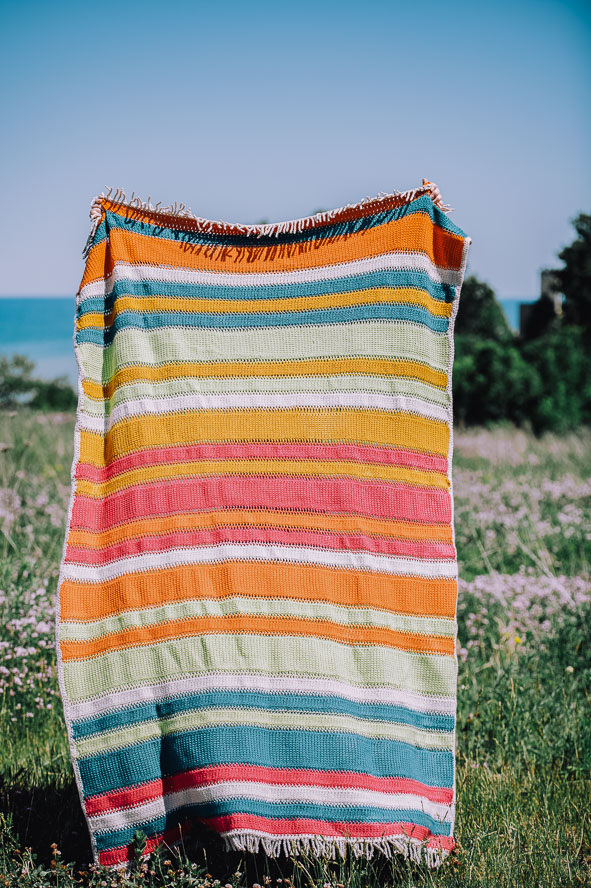
Inspired by colorful abstract paintings, this afghan is large enough to go over the top of a single bed, but it’s also the right size for a picnic on the beach. It is made with three sizes of strips using a hairpin loom (which have rows of sc between the side loops ), woven together. There is a right and a wrong side. Afghan is edged with a twisted fringe on the short edges, scs and hdcs along the long edges, using a neutral shade to imitate traditional woven blankets.
Time: 2-3 Week Project
Skill Level: Intermediate
Size: Approximately 48” [122 cm] x 72” [180 cm]
Gauge: 18 sts and 12 rows = 4” [10 cm] in single crochet worked on a hairpin loom
Materials
 Yarn: Stylecraft Special Aran (100% premium acrylic, 214 yards [196 meters]/100 grams): 1711 Spice (A, 3 balls), 1218 Parchment (B, 3 balls), 1709 Gold (C, 2 balls), 1083 Pomegranate (D, 3 balls), 1062 Teal (E, 3 balls), 1822 Pistachio (F, 3 balls)
Hook: US size H/8 (5 mm)
Notions: Hairpin loom sizes 2.5” [6 cm] and 5” [12.5 cm], removable markers, tapestry needle, ballpoint pen
Special Stitches
Hairpin Strip
Note: As strip gets longer and rods get crowded, remove lps from the bottom end of the loom and hold lps of each side on separate strand of yarn for future joining.
Set-up: Place slip knot on hook and holding hook in front of loom, wrap yarn around right loom rod from front to back (yarn is now behind loom), yo and pull through lp on hook; adjust lp length around right rod so that the upcoming foundation ch will be centered bet the rods.
Step 1: Make indicated number of ch for foundation ch.
Step 2: With hook still in lp, pass end of hook from front to back above the work bet loom rods, rotate loom like turning a page from right to left so hook comes to the front and yarn wraps around the other rod (yarn is again behind loom), yo and pull through lp on hook. (foundation ch suspended bet loom rods)
Step 3: Ch 1, sc in each foundation ch across.
Step 4: Pass end of hook from front to back above the work bet loom rods, rotate loom like turning a page from right to left (hook comes to front), wrapping yarn around other rod (yarn is again behind loom), yo and pull through lp on hook.
Step 5: Ch 1, sc across.
Rep Steps 4-5, ending with Step 4 until desired number of lps on each side has been reached. Fasten off.
Join 2 Hairpin Strips
Lay 2 strips flat next to each other.
Step 1: Insert hook in first lp of left strip.
Step 2: Insert hook in corresponding first lp of right strip and pull through lp of left strip.
Step 3: Insert hook in next lp of left strip and pull through lp of right strip.
Step 4: Insert hook in next lp of right strip and pull through lp of left strip.
Rep Steps 3-4 to end. Place final lp on holder.
Pattern Notes
Hairpin strips are made using 2 loom sizes. The narrowest ones begin with a foundation chain of 6 sts between loops. The larger loom size is used to make two strip sizes, beginning with a foundation chain of 14 or 16 sts.
Pattern
Using smaller loom, make Hairpin Strip with foundation ch 6 and 142 lps long on each side: 3 strips each in A, C, D, E., 5 strips each in B, F.
Using larger loom, make Hairpin Strip with foundation ch 14 and 142 lps long on each side: 2 strips in A, 1 strip each in B, D, E.
Using larger loom, make Hairpin Strip with foundation ch 16 and 142 lps long on each side:
2 strips n F.
Assembly
Join strips following color sequence chart with 1 row representing 6-ch foundation strips, 2 rows representing 14-ch foundation strips, and 3 rows representing 16-ch foundation strips.
Finishing
Edging
Rnd 1: With short edge of piece at the top, join B in right top corner, ch 1, work sc evenly spaced around all edges of piece including in held lps from joining 2 strips, working 3 sc in each corner; join with sl st in first sc.
Rnd 2: Ch 2, hdc in each st around, working 3 hdc in center corner st, join with sl st in first hdc.
Row 3 (fringe): *Pull up lp to the length of a ballpoint pen, then twist the hook 20 times, holding the yarn straight not allowing it yet to curl onto itself, sc in same st, now allowing yarn to curl, sc in next st; rep from * across short edge of piece. Fasten off.
Rep Row 3 along other short edge of piece. Fringes can be straightened out if they curl unevenly.
Weave in ends and block to measurements.


