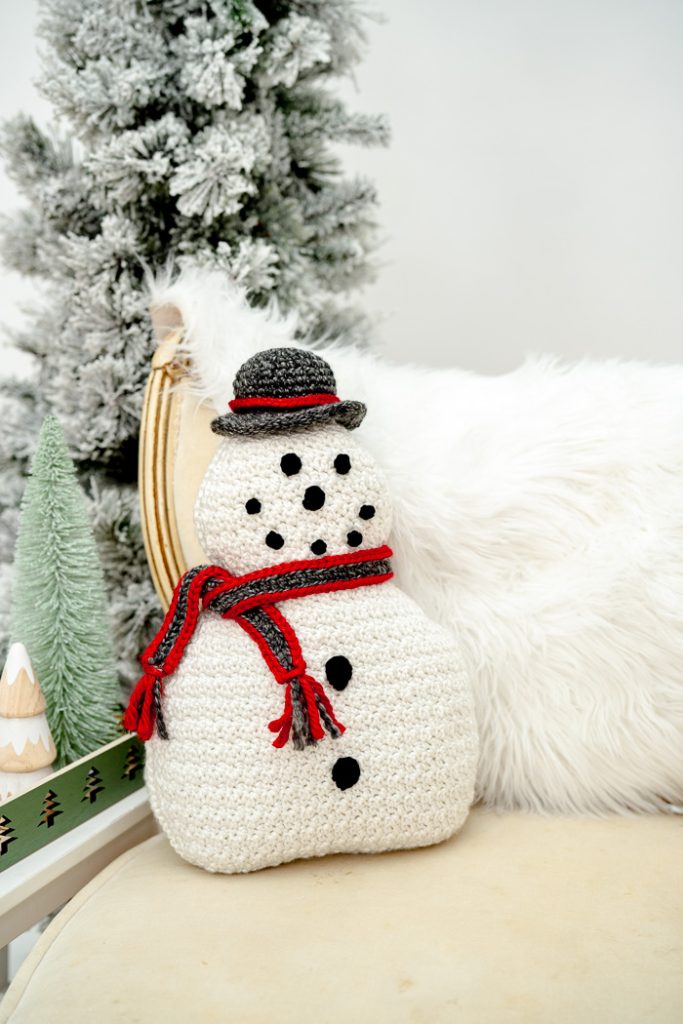
Discover the delightful Snazzy Snowman Pillow, crafted with a simple 2-stitch pattern repeat that creates a charming nubby texture. The clever stitch combination seamlessly joins the sections, enhancing the snowman’s whimsical appearance.
Adorned with a cheerful face and sporting a snazzy scarf and hat, this pillow promises to bring a smile to all your holiday guests. Perfect for adding a festive touch to any room, it embodies the joy and spirit of the season with its handmade charm and playful design.
Time: Weekend Project
Skill Level: Intermediate
Size: Approximately 16 inches H x 11 inches W
Gauge: 8 sts and 5 rows = 2” [5 cm] in Sc, dc stitch
Materials
Yarn:

Lion Brand Homespun (98% acrylic/2% other fiber; 185 yards [169 meters] / 6 ounces [170 grams]): #300A Hepplewhite (MC 2 skeins), #312 Edwardian (CC1 1 skein)

Lion Brand Hometown (100% acrylic; 81 yards [74 meters] / 5 ounces [142 grams]: #113N Cincinnati red, (CC2 1 skein)

Lion Brand Basic Stitch (100% acrylic; 185 yards [170 meters] / 3.5 ounces [100 grams]): #153 black (CC3 1 skein)
Hook: US size G/6/4mm hook and B/1/2.25mm
Notions: Fairfield Poly-fil extra loft quilt batting, four 20” H x 15” W rectangles, Fairfield Poly-fil polyester fiberfill, tapestry needle, stitch markers, scissors
Special Stitches
Single crochet decrease in next 3 sts (sc dec in next 3 sts): With lp on hook, insert hook in indicated st, yo, pull up a lp, [insert hook in next st, yo, pull up lp] twice, [yo, pull lp through 3 lps on hk, yo, pull through rem 2 lps on hook.
Double crochet decrease in next 3 stitches (dc dec in next 3 sts): With lp on hook, yo, insert hook in indicated st, yo, pull up a lp, [insert hook in next st, yo, pull up lp] twice, [yo, pull lp through 3 lps on hk] twice.
Single crochet join (sc join): With slip knot on hook, insert hook into indicated st, yo, pull up lp, yo, pull lp through both lps on hook.
Pattern Notes
Snowman is worked in rows from bottom edge to top of head.
Weave in ends as work progresses.
Chain-3 at beginning of rounds or rows counts as a stitch.
Chain-1 at beginning of rounds or rows does not count as a stitch.
Do not join unless otherwise noted.
Pattern
Snowman Body
Make 2.
Beg at bottom edge with MC and larger hook, ch 33.
Row 1 (WS): (Sc, dc) in 2nd ch (first inc made), [sc in next ch, dc in next ch] across to last ch, (sc, dc) in last ch (2nd inc made), turn. (34 sts)
Row 2: Ch 3 (see Pattern Notes), sc in same place at base of beg ch-3 (inc made), [dc in next st, sc in next st] across to last st, (dc, sc) in last st (inc made), turn. (36 sts)
Row 3: Ch 1 (see Pattern Notes), (sc, dc) in first st, [sc in next st, dc in next st] across to last st, (sc, dc) in last st, turn. (38 sts)
Row 4: Ch 1, sc in first st, dc in next st, [sc in next st, dc in next st] across, turn.
Row 5: Rep row 2. (40 sts)
Row 6: Ch 3, sc in next st, [dc in next st, sc in next st] across, turn.
Row 7: Rep row 3. (42 sts)
Row 8: Rep row 4.
Row 9: Rep row 2. (44 sts)
Rows 10-18: Rep row 6.
Row 19: Ch 1, sc dec in first 2 sts, [ dc in next st, sc in next st] across to last 2 sts, dc dec in last 2 sts, turn. (42 sts)
Row 20: Rep row 4.
Row 21: Ch 3, sc dec in next 2 sts, dc in next st, [sc in next st, dc in next st] across to last 2 sts, sc dec in last 2 sts, turn. (40 sts)
Row 22: Rep row 19. (38 sts)
Row 23: Rep row 21. (36 sts)
Row 24: Rep row 19 (34 sts)
Row 25: Rep row 21. (32 sts)
Row 26: Rep row 19 (30 sts)
Row 27: Ch 1, sc dec in next 3 sts (see Special Stitches), sc in next st, [dc in next st, sc in next st] across to last 3 sts, dc dec in next 3 sts (see Special Stitches), turn. (26 sts)
Row 28-29: Rep row 27 twice. (18 sts)
Rows 30-31: [Rep row 4] twice.
Rows 32-33: Rep row 2-3 once. (22 sts).
Row 34: Rep row 2. (24 sts)
Rows 35 – 37: [Rep row 6] 3 times.
Row 38: Rep row 19 (22 sts)
Row 39: Rep row 21. (20 sts)
Row 40-43: [Rep last 2 rows] twice (12 sts)
Row 44: Rep row 2. Fasten off.
Edging
Rnd 1: With snowman bottom RS facing, working stitches in ends of rows along right side edge of snowman, with MC and larger hook, sc join in row 1, work 33 sc evenly spaced and increasing where necessary, to end of row 27, work 18 sc along right side edge of head to row 44, 1 sc in first st of row 44, sc in next 11 sts of row 44, place a st marker in last sc made, working in ends of rows along left side edge of snowman head, work 18 sc to end of row 27, work 34 sc along snowman left side edge to row 1, working in opposite side of foundation ch, sc in each of next 32 chs, join in beg sc. Fasten off. (148 sc)
Hat
With CC1 and larger hook, make a magic circle.
Rnd 1: Ch 1, sc in circle, place a st marker in sc just made to mark beg of rnd, 5 sc in circle. Do not join (see Pattern Notes). (6 sc)
Rnd 2: 2 sc in each st around. (12 sc)
Rnd 3: [2 sc in next st, sc in next st] around. (18 sc)
Rnd 4: [2 sc in next st, sc in next 2 sts] around. (24 sc)
Rnd 5: [2sc in next st, sc in next 3 sts] around. (30 sc)
Rnd 6: [2 sc in next st, sc in next 4 sts] around. (36 sc)
Rnds 7-11: Sc in each st around, join (see Pattern Notes) in back lp of beg sc. Place a st marker in front lp of sc.
Lower Brim
Rnd 12: Ch 1, working in back lps of sts, 2 sc in first st, sc in next 5 sts, [2 sc in next st, sc in next 5 sts] around, join in beg sc. (42 sc)
Rnd 13: Working in both lps of sts, ch 1, sc in first 3 sts, [2 sc in next st, sc in next 6 sts] 5 times, 2 sc in next st, sc in next 3 sts, join in beg sc. (48 sc)
Rnd 14: Ch 1, 2 sc in first st, sc in next 7 sts, [2 sc in next st, sc in next 7 sts] around, join in beg sc. Fasten off. (54 sc)
Upper Brim
Rnd 12: Fold stitches of Lower Brim to back, working in unworked front lps of rnd 11 with CC1 and larger hook, sc join in marked lp of rnd 11, sc in same place, sc in next 5 sts, [2 sc in next st, sc in next 5 sts] around, join in beg sc. (42 sc)
Rnds 13-14: Rep rnds 13-14 of Lower Brim, do not join at end of rnd 14. (54 sc)
Assembly
With upper brim RS facing, holding last rnd of upper and lower brims together and working through both layers in sts of rnd 14, sl st in first st and in each st around, join in beg sl st. Fasten off. (54 sl sts)
Hat Band
Leaving a 4-inch beg tail with CC2 and larger hook, ch 40, join in last ch from hook to form a ring. Fasten off leaving a 4-inch tail. Place hat band around hat just above the brim, pull yarn tails to WS and knot to secure.
Nose
Make 1
With CC3 and smaller hook, make a magic ring.
Rnd 1: Ch 2 (counts as a st), (2 hdc, 3 sc, 3 hdc, 3 sc) in ring, join in top of beg ch-2. Fasten off leaving an 8-inch tail. (12 sts)
Buttons
Make 2
Rnd 1: With CC3 and larger hook, rep rnd 1 of Nose.
Eyes
Make 2.
With CC3 and smaller hook, make a magic circle.
Rnd 1: Ch 1, 8 sc in ring, join in beg sc. Fasten off leaving an 8-inch tail. (8 sc)
Mouth
Make 5
With CC3 and smaller hook, make a magic circle.
Rnd 1: Ch 1, 5 sc in ring, join in beg sc. Fasten off leaving an 8-inch tail. (5 sc)
Scarf
With CC1 and larger hook, ch 102.
Row 1(RS): Working in 3rd bar of chs, sk first 3 chs (counts as beg dc), dc in 4th ch from hook and in each ch across. Fasten off. Do not turn. (100 dc)
Row 2: With last row RS facing, working in back lp of sts with CC2, leaving a 6-inch beg tail, sl st join in 3rd ch of beg dc, loosely sl st in each st across. Fasten off leaving a 6-inch tail. Do not turn.
Row 3: With opposite side of foundation ch RS facing, working in back lp of chs with CC2, leaving a 6-inch beg tail, sl st join in first ch, loosely sl st in st in each ch across. Fasten off leaving a 6-inch tail.
Fringe
Cut 2 12-inch strands of CC1 and 1 12-inch strand of CC2 and thread through tapestry needle. Insert needle from RS to WS through center bottom edge of one scarf end, pull yarn through leaving about 4 inches of yarn tails on RS, insert needle from WS to RS through same place, pull through 4 inches of yarn tails and leaving a loop on WS of scarf, remove needle. Pull all 6 yarn tails from RS to WS through loop, pull CC2 yarn tails on each side of same end through loop, pull tails tightly to create fringe. Trim fringe to 2 inches or to desired length. Rep to add fringe to opposite end of scarf.
Finishing
Place one snowman body onto batting and use scissors to cut around shape for stuffing. Using batting piece just cut as pattern, cut 3 more layers of batting.
Place 2 layers of batting on flat surface, center WS of one snowman over batting, arrange nose, eyes, mouth and buttons where desired and use tapestry needle and yarn tails to sew into position through snowman and batting layers to create snowman Front.
Place 2nd snowman (Back) WS up on a flat surface, center remaining 2 batting layers on Back, place snowman Front RS up over batting. Gently push in any batting that extends beyond edging rnd of snowman.
Joining Rnd
Rnd 1: With top of snowman RS facing, using MC and larger hook and working through both layers in sts of edging rnd, sl st join in marked sc of edging rnd, ch 1, [sl st in next st, ch 1] around, using fiberfil to firmly stuff snowman head and body to desired thickness before closing, join in beg sl st. (148 sl sts)
Lightly stuff hat and use CC1 to sew hat to top of head where desired.
Tie scarf around neck.


So cute, this should put a smile on anyone’s face. Thank you.