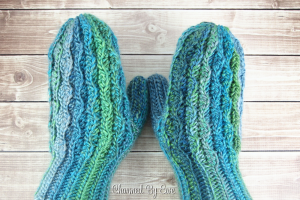
The end of January is drawing near, and hopefully you have all enjoyed working up this fresh new design as a way to really set the tone for a bright and happy 2017. The Wonderland Mittens’s vibrant colors and eye-catching wave stitch have both contributed to a fabulous start to another year of crocheting. This final stage will show you how to crochet the thumb, and it also includes a printable version of the pattern along with a useful chart to consult.
Once you finish, these crochet mittens will reward those hard-working crochet fingers with soft warmth. Enjoy!
Don’t forget the different gauge for each section:
- Gauge in HDC: 14 stitches and 11 rows = 4″ (10 cm)
- Gauge in Wave Pattern: 8.5 stitches and 8 rows = 2″ (5 cm)
- Gauge in Slip Stitch Cuff: 9 stitches and 12 rows = 2″ (5 cm)
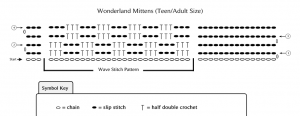
I’m definitely a visual learner, which is why having a diagram is so handy. Plotting out the stitches alongside the pattern can help you picture the finished product, so Janaya included a useful chart here for you as well. If you need a closer look, just click on the image for a full-screen view.
Mitten Pattern Continued:
Child (5-10 Years) • Palm circumference = 6″ – 7.5″
Thumb – The thumb covering will be worked in short rows. Slip stitch to join in any stitch along the opening. Wherever you join will be the location of the seam, so I suggest joining at the top of the opening.
Row 1: Ch 11, working in the back bumps of the chain, sl st in 2nd ch from hook, sl st in next 9 chs, sl st in same st as your join, sl st in next st of the thumb opening, turn (10). The last 2 sts of Row 1 are not included in the stitch count, do not work into them when you work back across for Row 2. Only work the 10 counted stitches.
For the remainder of the pattern, work in the Back Loops only.
Row 2: Work 10 sl sts to end of row, turn (10)
Row 3: Ch 1, sl st in 10 sts, sl st to join in the next st on the thumb opening, sl st in next st again, turn (10)
Row 4 – 13: Repeat Rows 4 and 5
Fasten off leaving a lengthy tail for seaming. Seam the edges of the first and last row together, and then close the tip in the same manner as the mitten top.
Teen/Adult • Palm circumference = 7.5″ – 9″
Thumb – The thumb covering will be worked in short rows. Slip stitch to join in any stitch along the opening. Wherever you join will be the location of the seam, so I suggest joining at the top of the opening.
Row 1: Ch 13, working in the back bumps of the chain, sl st in 2nd ch from hook, sl st in next 11 chs, sl st in same st as your join, sl st in next st of the thumb opening, turn (12). The last 2 sts of Row 1 are not included in the stitch count, do not work into them when you work back across for Row 2. Only work the 12 counted stitches.
For the remainder of the pattern, work in the Back Loops only.
Row 2: Work 12 sl sts to end of row, turn (12)
Row 3: Ch 1, sl st in 12 sts, sl st to join in the same stitch on thumb opening that you started in, sl st in next st on thumb, turn (12)
Row 4: Work 12 sl sts to end of row, turn (12)
Row 5: Ch 1, sl st in 12 sts, sl st to join in the next st on the thumb opening, sl st in next st again, turn (12)
Row 6 – 19: Repeat Rows 4 and 5
Fasten off leaving a lengthy tail for seaming. Seam the edges of the first and last row together, and then close the tip in the same manner as the mitten top.


I wanna know if the stitch is a multiple of 3
The stitch pattern repeat is a multiple of 6+3
I want to know if the stitch of 3
I wanna know if the stitch is a multiple of3 cause I want to make the mittens longer and I want to make a cowl. I love so much your pattern
wow thats so adorable, will be warm compare to the readymade Mittens. The machinery Mittens are expensive too. I am new to knitting and have been taking online classes and so far i have created small items and these Mittens would be a great idea for my weekend project.Thanks for the insipiration. I have downloaded the pdf for the pattern. Thanks again for sharing this. I will be subscribing you blog for more posts like this..
how do you start the cuff? and then get to the start of row 1 for the mitten? i cant find the instructions that give even how many chains to start with.
You need to click on the pdf link to download the printable version.
What size hook do you use?
maybe I will be able to subscribe soon 🙂