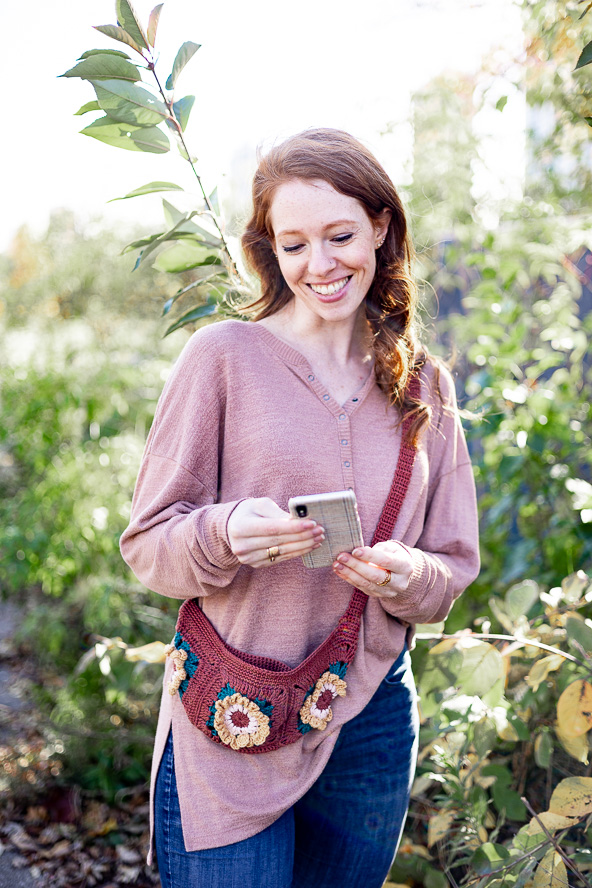
Granny squares are a favorite and what better way to wear them than with a cute over-the-shoulder bum bag to accessorize any outfit. Pamela is a quick make, using just four floral granny squares.
Time: Weekend Project
Skill Level: Easy
Size: Finished Size 14” Length x 6” Depth
Gauge: First 2 rounds = 2” [5 cm]
Materials
 Yarn: Scheepjes Catona (100% Mercerized Cotton; 137 yards [125 meters]/50 grams): 504 Brick Red (CC1, 2 balls), 263 Petal Peach (CC2, 1 balls), 179 Topaz, (CC3, 1 Balls), 391 Deep Ocean, (CC4, 1 Balls).
Hook/Needles: US size D-3/10 (3.25 mm)
Notions: Removable markers, tapestry needle, scissors
Downloads
Abbreviations
PS – Puff Stitch
Special Stitches
PS – *Yo, insert hook, yo, pull up loop, rep from * 2 more times, yo, pull through all 7 loops on hook.
Pattern
Square Motif (make 4)
Using CC1, create a magic ring,
Round 1: Ch 3, work 16 dc into ring, join with CC2 to first dc, fasten off CC1. (16 sts)
Round 2: Ch 2, PS in same st, ch 1, *PS in next st, ch 1, rep from * around, sl st to top of beg ch, fasten off CC2. (16 PS)
Round 3: With CC3, join in flo of any PS, *(ch 2, 4 dc, ch 2, sl st) in same st (petal made), sk st, sl st in flo of next PS st, rep from * around, fasten off CC3. (16 petals)
Round 4: With CC4, join to any ch-1 sp from Round 3, ch 6 (counts as a tr, ch 2 throughout), 3 tr in same sp, *ch 1, sk ch-1 sp, 3 tr in next ch-1 sp, ch 1, sk ch-1 sp, (3 tr, ch 2, 3 tr) in next ch-1 sp, rep from * 2 times, ch 1, sk ch-1 sp, 3 tr in next ch-1 sp, ch 1, 2 tr in same sp as first 3-tr, sl st in 4th ch of beg ch-6, fasten off CC4 and join in CC1.
Round 5: Sl st in ch-2 sp, ch 6, 3 tr in same sp as sl st, *[tr in next 3 sts, 2 tr in next ch-1 sp] twice, tr in next 3 sts **, (3 tr, ch 2, 3 tr) in next ch-2 sp, rep from * around ending last rep at **, 2 tr in same sp as first 3-tr, sl st in 4th ch of beg ch-6.
Round 6: Sl st in ch-2 sp, 2 sc in same sp as sl st, *sc across to ch-2 sp, 3 sc in ch-2 sp, rep from * 2 times, sc across to ch-2 sp, sc in same sp as first 2-sc, sl st to join. Fasten off.
Finishing
Joining
- Place a marker in the center sc of 1 corner of the granny square, repeat this for a second granny square.
- Arrange squares into joining order according to diagram, assuring all are facing the same direction. Place the two granny squares with marker on either side with the marker st in the top outwards corner.
- With right sides of motifs held together, sl st 2 squares together at a time using FLO of closest square and BLO of farthest square, until all squares have been joined.
- Turn bag so that right side of squares are facing outside and seams are on inside.
Border
Row 1: With right sides of motifs facing, join CC1 to any st, sc in next st and each st around moving marker up with each row.
Row 2-4: Sc in next and each st around, sl st to join to previous row. Fasten off.
Handle
With CC1 ch 10,
Row 1: Sc second st from hook and next 8 sts, ch 1, turn, place marker in 4th sc. (9 sts)
Row 2: Sc2tog, sc 5, sc2tog. (7 sts)
Row 3: Sc2tog, sc 3, sc2tog. (5 sts)
Row 4-75: Sc in each st across.
Row 76: 2 sc in next st, sc 3, 2 sc in last st. (7 sts)
Row 77: 2 sc in next st, sc 2, sc in next st and place marker, sc 2, 2 sc in last st. Fasten off. (9 sts)
Sew handle to either side of the bag, line each marker up and sew across all 9 sts.
View this post on Instagram


I’m looking for mitten and bedroom slipper patterns
Hi Anna! Take a look at these patterns:
https://www.ilikecrochet.com/category/crochet-slippers-and-socks/
https://www.ilikecrochet.com/category/crochet-mitten-and-glove-patterns/
Enjoy! – Nicola, Editor
Looks delightful
I shall have a try at making it
I don’t see any diagram. It says to follow diagram. I sure am anxious to make this. Thanks
Hello! Charts are always on the far right side of the pattern page underneath the photos. Here is a direct link to the charts as well:
https://www.ilikecrochet.com/wp-content/uploads/Pamela-Granny-Square-Bum-Bag-Diagram.pdf
Thanks! – Nicola, Editor
I don’t understand what you want.
What closure is on this?
Hi Phyllis, this particular sample does not have a closure, but a nice leather one from Etsy would work really nicely I think! – Nicola, Editor
How do i print this?
Hello Shari! You are welcome to save this pattern by copying and pasting into a word document or by printing the pattern via the printer icon on the left hand side of your screen. Hope this helps! – Nicola, Editor