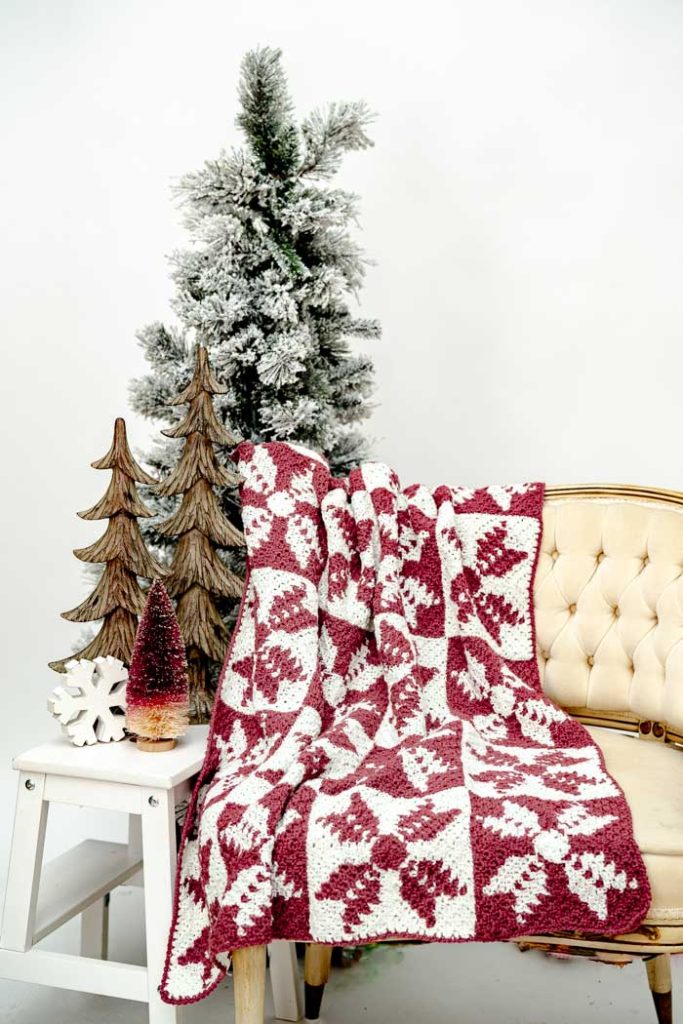
This Corner-to-Corner (C2C) crochet project combines the timeless elegance of snowflakes with the rustic charm of a classic plaid design, resulting in a delightful piece that captures the magic of winter.
Time: 50-hour pattern
Skill Level: Intermediate
Finished Size: 51” / [127.5 cm] tall x 34” / [85 cm] wide
Gauge: 5.5 blocks = 4” [10 cm] in C2C hdc block stitch
Materials
 Yarn: Scheepjes Scrumptious (50% Recycled Polyester, 50% Acrylic); 328 yards [300 meters] / 3.6 ounces [100 grams]: 302 Buttercream Icing (MC, 4 balls), 322 Summer Berry Tartlet (CC, 4 balls).
Hook: US size G/6 4.0 mm.
Notions: Scissors and tapestry needle.
Abbreviations
C2C: corner-to-corner
Pattern Notes
Each snowflake is made from 4 small squares that are sewn together as shown in Snowflake Assembly Chart. Later, snowflakes are joined together as shown in the Full Plaid Chart.
Although RS and WS are almost identical, I recommend identifying RS/WS of each square before seaming for a better and more consistent finishing.
Leave at least 16” [40 cm]/ 5” [12.5 cm] tails in CC1/CC2 when cutting yarn in every other small square. The yarn tails are used to sew the small squares.
Follow color changes according to chart.
To change colors, yarn over with the new color to complete the last stitch (hdc) in the old color.
There is no need to cut the yarn when changing colors. Drop unused yarn after a color change. The dropped yarns can be carried along the row and worked over by the active color until needed in the same or adjacent row(s). there is no need to carry the unused yarn to the end of the row after the last color change.
Ch 2 at beg of blocks counts as 1 hdc.
Pattern
Small Squares (make 96 (48 of each CC combination))
Use the chart or the row-by-row instructions below for color changes.
You need to make 48 small squares of each CC combination:
Combi 1: CC1: MC; CC2: CC
Combi 2: CC1: CC; CC2: MC
Row 1 begins in bottom right corner of chart.
With CC1, ch 4.
Row 1 (RS): Hdc in 3rd ch from hook and in next ch (beg block made), turn block to left. (1 block)
Row 2 (WS): Ch 4, dc in 3rd ch from hook and in next ch (increase made), sl st in ch-2 sp of 1st block below, ch 2, 2 hdc in ch-sp, turn piece to left. (2 blocks)
Row 3: Ch 4, hdc in 3rd ch from hook and in next ch (increase made), *sl st in ch-2 sp of block below, ch 2, 2 hdc in ch-2 sp, changing colors as directed in Charts; rep from * across, turn piece to left. (3 blocks)
Rows 4-10: As Row 3 (increasing 1 block each row) (10 blocks)
Row 11: Sl st in 1 hdc of the last block of the previous row, sl st in ch-2 sp (decrease made), *ch 2, 2 hdc in ch-2 sp, sl st to next block; rep from * to last block,do not add a block on top of last block from prev row. (9 blocks)
Rows 12-19: As Row 11 (decreasing 1 block each row). (1 block)
Fasten off.
Row-by-row instructions for changing colors in blocks
Row 1 (RS): 1 CC1.
Row 2 (WS): 2 CC1.
Row 3: 3 CC1.
Row 4: 4 CC1.
Row 5: 5 CC1.
Row 6: 6 CC1.
Row 7: 1 CC1, 1 CC2, 3 CC1, 1 CC2, 1 CC1.
Row 8: 2 CC1, 1 CC2, 2 CC1, 1 CC2, 2 CC1.
Row 9: 2 CC1, 2 CC2, 1 CC1, 2 CC2, 2 CC1.
Row 10: 3 CC1, 4 CC2, 3 CC1.
Row 11: 2 CC1, 2 CC2, 1 CC1, 2 CC2, 2 CC1.
Row 12: 2 CC1, 4 CC2, 2 CC1.
Row 13: 1 CC1, 2 CC2, 1 CC1, 2 CC2, 1 CC1.
Row 14: 1 CC1, 4 CC2, 1 CC1.
Row 15: 1 CC1, 1 CC2, 1 CC1, 1 CC2, 1 CC1.
Row 16: 1 CC1, 2 CC2, 1 CC1.
Row 17: 3 CC1.
Row 18: 2 CC2.
Row 19: 1 CC2
Assembling
With RS facing, seam small squares with yarn tail matching color (see Snowflake Schematic) and then seam snowflakes with MC according to Full Plaid Schematic.
Border
Rnd 1: Attach CC near a corner with sl st, ch 1, * (1 sc, ch 1, 1 sc) in corner, (1 sc, ch 1) in edge of next block until next corner; rep from * around, join with sl st in first sc.
Rnd 2: Reverse sc in each ch1-sp, sl st to first st to join.
Fasten off.
Weave in ends.


