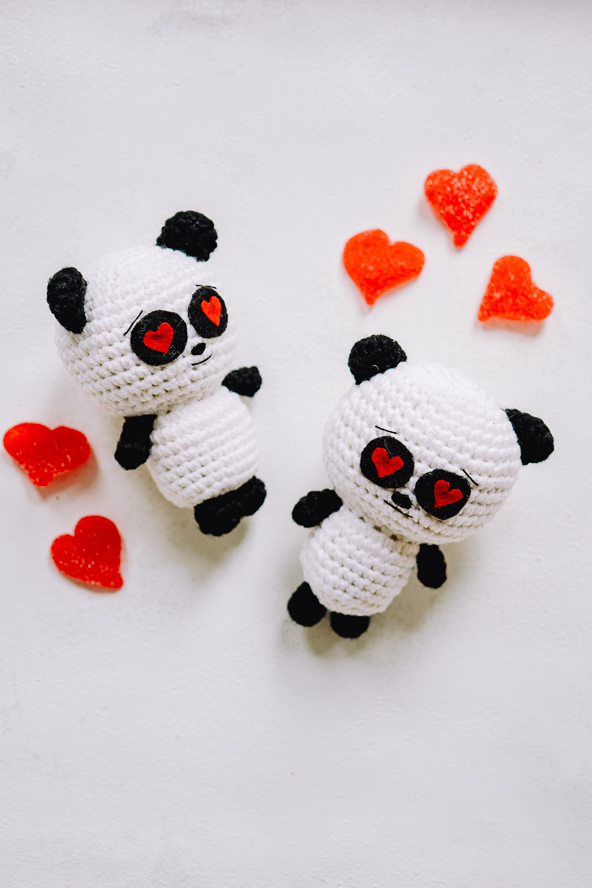
Fall in love with this adorable Bear-y in Love Panda Amigurumi, a perfect little project for the season of love! Crocheted with love and attention to detail, this sweet panda is brought to life with felt eyes and charming heart embellishments, giving him all the Valentine’s Day vibes. Whether you’re making this as a gift or to add some cuteness to your own space, this lovable panda is sure to steal your heart.
This pattern is designed for crocheters of all skill levels and includes easy-to-follow instructions for creating this delightful bear. Get creative and experiment with different colors to make your panda truly one-of-a-kind. Perfect for adding a little extra love to your home or gifting it to someone special!
Skill Level: Easy
Size: 5.5” / [13.97 cm] tall
Gauge: 20 sts and 20 rows = 4” [10 cm] in pattern
Materials
 Yarn: Red Heart Super Saver (100% Acrylic; 364 yards [333 meters]/198 grams): 311 White (1 skein), 312 Black (1 skein)
Hook: US size (3.0 mm)
Notions: Tapestry needle, polyfil, felt (black and red), scissors, sewing needle, hot glue gun (for gluing your felt eyes on), embroidery thread
Abbreviations
Ch – chain
Sc – single crochet
Special Stitches
Inc – work 2 sc in st indicated
Dec – work 2 sc together
Pattern Notes
This pattern is worked in the round, from the top down. Also, please ensure that you stuff the amigurumi with the fiber fill as you go.
Pattern
Head and Body (worked as one piece)
Rnd 1: Starting at the top of Panda’s head with white, make magic ring, work 6 sc in ring. Or ch 2, work 6 sc in second chain from hook. (6 sts)
Rnd 2: Inc 6 times. (12 sts)
Rnd 3: (Sc in next st, inc) 6 times. (18 sts)
Rnd 4: (Sc in next st, inc) 9 times. (27 sts)
Rnd 5: Sc in next st, (sc in next 3 sts, inc) 6 times, sc in next 2 sts. (33 sts)
Rnd 6: Sc in each st around. (33 sts)
Rnd 7: (Sc in next 4 sts, inc) 6 times, sc in next 3 sts. (39 sts)
Rnd 8: Sc in each st around. (39 sts)
Rnd 9: (Sc in next 4 sts, inc) 7 times, sc in next 4 sts. (46 sts)
Rnds 10-11: Sc in each st around. (46 sts)
Rnd 12: Sc in next st, (sc in next 7 sts, dec) 5 times. (41 sts)
Rnds 13-15: Sc in each st around. (41 sts)
Rnd 16: Sc in next st, (sc in next 2 sts, dec) 10 times. (31 sts)
Rnd 17: Sc in next st, dec 15 times. (16 sts)
Rnd 18: Sc in each st around. (16 sts)
Rnd 19: Stuff Head firmly, inc 16 times. (32 sts)
Rnd 20: Sc in each st around. (32 sts)
Rnd 21: Sc in next st, (sc in next 3 sts, dec) 6 times, sc in next st. (26 sts)
Rnds 22-25: Sc in each st around. (26 sts)
Rnd 26: Dec 13 times. (13 sts)
Rnd 27: Stuff Panda firmly from this point on, sc in next st, dec 6 times. (7 sts)
Rnd 28: Dec 3 times, sc in next st. (4 sts)
Rnd 29: Dec twice to close. (2 sts)
Fasten off.
Ear (make 2)
Rnd 1: Starting at the tip of Ear and with black, make magic ring, work 6 sc in ring. Or ch 2, work 6 sc in second chain from hook. (6 sts)
Rnd 2: (Inc, sc in next st) 3 times. (9 sts)
Rnds 3-5: Sc in each st around. (9 sts)
Fasten off.
Leg (make 2)
Rnd 1: Starting at the bottom of Leg with black, make magic ring, work 6 sc in ring. Or ch 2, work 6 sc in second chain from hook. (6 sts)
Rnd 2: (Inc, sc in next 2 sts) twice. (8 sts)
Rnd 3: Sc in each st around. (8 sts)
Rnd 4: (Dec, sc in next 2 sts) twice. (6 sts)
Fasten off.
Arm (make 2)
Rnd 1: Starting at the bottom of Arm with black, make magic ring, work 6 sc in ring. Or ch 2, work 6 sc in second chain from hook. (6 sts)
Rnds 2-3: Sc in each st around. (6 sts)
Rnd 4: Dec, sc in next 4 sts. (5 sts)
Rnd 5: Sc in each st around. (5 sts)
Fasten off.
Finishing
Assembly
Make sure Panda is stuffed firmly. Weave in the end and trim it.
Sew on Ears, Arms, and Legs. Weave in your ends and trim them.
Cut Eyes from felt and glue to Panda.
Use black embroidery thread, sew on mouth and eyebrows.


I’m thrilled to make several of these little fellows❤️
For some reason I am not being accepted as a Gold membership person. This is my second year and I have paid. Whenever I choose to look at a project the screen tells me I have used my free items,
Hi Charlotte, looks like you might be having trouble accessing your account? Our customer service team can make sure everything is in order if you shoot them an email. We are happy to help! Thanks 🙂 https://www.ilikecrochet.com/contact-us/
– Nicola, Editor
Oh how cute they are! Can’t wait to make them.
Just so adorable! Thank you.