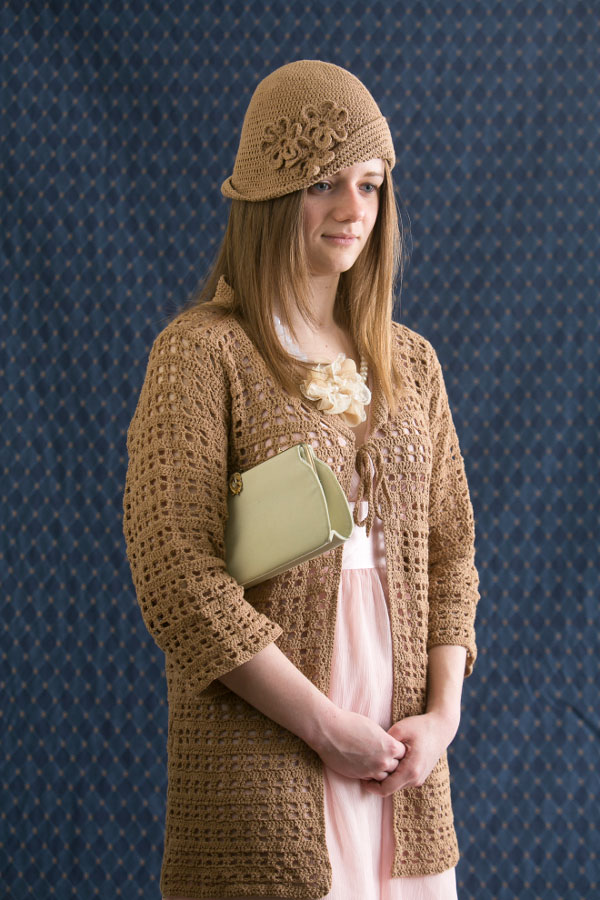
This “Downton Abbey” inspired crocheted cardigan is worked in a simple yet striking allover lace pattern. The deep V-neck is accentuated by a single crochet collar and feminine tie closure. The finished garment can be paired with spring florals to complete the 1920’s style.
Skill Level: Intermediate
Size: Finished Bust Size: 33⅞ (37½, 41⅞, 45½, 50½)” to fit bust 30 (34, 38, 42, 46)”; 3-4” positive ease recommended; Shown in size 34”
Gauge: 22 sts and 11.5 rows = 4” [10 cm] in St st after blocking
Materials
Yarn: HiKoo by Skacel Collection CoBaSi (55% cotton, 21% elastic, 16% bamboo, 8% silk; 220 yards [201 meters]/50 grams): #20 Chocolate Milk (MC) (7 [7, 8, 8, 9) ] skeins
Hooks: US size E/4 (3.5 mm) hook, US size C/2 (2.75 mm) hook or size required for gauge
Notions: Tapestry needle, stitch markers
Pattern Notes
Sleeve is shaped by changing hook size once.
Armhole and neck shaping occur at the same time.
Neck and armhole are shaped by skipping stitches. In cases where final set of skipped stitches leave chains at end of row, simply replace these chains with double crochet stitches and work the rest of pattern stitch as usual.
Pattern
Back
Using larger hook, chain 96 (108, 116, 128, 140).
Row 1 (RS): Dc in 3rd ch from hook and in each ch across, turn.
Row 2 (WS): Ch 2, dc in first 2 dc, *ch 2, sk 2 dc, dc in next 2 dc, rep from * across, turn.
Row 3: Ch 2, dc in first 2 dc, *sk next ch-2 sp, dc in next 2 dc, rep from * across, turn.
Row 4: Ch 2, dc in first 2 dc, *2 dc in next ch-2 sp, dc in next 2 dc, rep from * across, turn.
Rep rows 2-4 16 more times for a total of 52 rows then fasten off.
Shape Armhole
Place marker in 13th (17th, 19th, 21st, 24th) st from end on each side.
Sizes 30, 34, 42 and 46 Only
Turn work then join yarn in marked st, ch 2 then work next 70 (74, –, 86, 90) sts in est patt ending in last marked st. The last 12 (16, –, 20, 24) st of the row will remain un-worked. Cont evenly in established patt for 17 (19, –, 22, 23) more rows then fasten off.
Size 38 Only
Establish patt over next 78 sts as follows: Turn work then join yarn in marked st, ch 2, dc in next 4 dc, *ch 2, sk next 2 dc, dc in next 2 dc, rep from * ending with dc in last 3 st before marker, then dc in final marked st for a total of 78 sts. Work evenly for 20 more rows then fasten off.
All sizes
Continue to Front.
Front (Make 2)
Using larger hook, chain 48 (52, 60, 64, 72). Work as for back for total of 52 rows. Next row: Shape armhole same as back. At the same time, skip 4 sts at neck edge, then work back. Cont in established patt skipping 4 sts at neck edge 3 (3, 4, 4, 4) more times, then skip 2 (2, 0, 1, 2) sts at neck edge once. Work evenly for 9 (11, 11, 12, 13) more rows then fasten off.
Sleeve (Make 2)
Using larger hook, chain 72 (80, 84, 90, 96). Work in patt for 34 rows. Change to smaller hook and work 9 rows in established patt, then fasten off.
Finishing
Block pieces to finished measurements. Set in sleeves, then seam sides.
Trim
Using larger hook and with RS facing, join yarn at bottom edge of right front and work evenly in sc st until neck shaping is reached. Sc in the point of first step, *ch 3, sc in next step, rep from * across until all steps have been bridged, then cont around neck.
Rep bridging technique on other side and cont in sc to left bottom front edge.
Next row: ch 1, work a row of sc evenly across placing 3 sc in each ch-3 sp, then fasten off.
Collar
Using larger hook and with RS facing join yarn at V-neck edge, ch 1 and work across evenly in sc until 1st corner. Work 2 sc in corner st and place marker (corner inc), cont around neck to 2nd corner and rep corner inc, end row at opposite edge of v-neck then turn.
Next row: ch 1, sc in each sc st until corner, work corner inc in st just before marker, move marker to sc just completed, cont across working 2nd corner inc same as first.
Rep last row 8 more times until collar measures approx 1 1/2″ or 4 cm then fasten off.
Ties
Attach ties just below collar on each side as follows: Using larger hook, join yarn and ch 76, sl st in 2nd ch from hook and in each ch across, then fasten off.
Block garment once more. Weave in ends.


Is there a pattern for the hat you need both to create the Downton Abbey look!
Here is the hat pattern! https://www.ilikecrochet.com/magazine/crochet-hat-patterns/downton-cloche/
what the heck does this item look like? the pic only shows a close up of the tied bow. no way im spending money for yarn and my time to create an unknown crochet project!
Hi Peggy! We’ve updated the featured photo, sorry about that! – Nicola, Editor