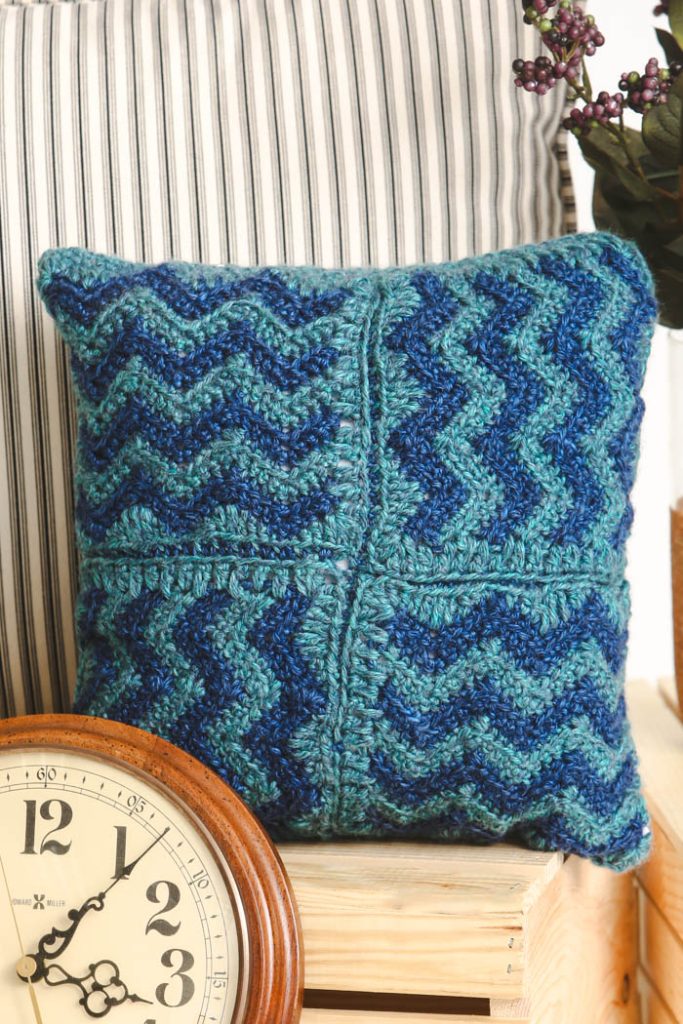
Add a touch of modern elegance to your home with the Oceanic Chevron Pillow, a decorative masterpiece that blends style and practicality. The striking chevron pattern brings texture and visual interest to your living space, making this pillow the perfect accent for your couch, bed, or favorite chair. Whether you’re looking to refresh your décor or create a standout centerpiece, this pattern is an effortless way to infuse your home with charm and personality.
Skill Level: Easy
Size: 12” x 12”
Gauge: 6” [15 cm] square in pattern after blocking
Materials
Yarn:
![]() Lion Brand Heartland (100% acrylic; 251 yards [230 meters]/142 grams): #109 Olympic (CA, 1 ball), #105 Glacier Bay (CB, 1 ball)
Lion Brand Heartland (100% acrylic; 251 yards [230 meters]/142 grams): #109 Olympic (CA, 1 ball), #105 Glacier Bay (CB, 1 ball)
Hook: US size I/9 (5.5 mm) hook
Notions: Tapestry needle, (2) 0.75” sew through or shank buttons, 12” x 12” pillow form, locking stitch marker (optional)
Abbreviations
Single crochet 2 sts together (sc2tog): (Insert hook in next st, yo and draw up a loop) twice, yo and draw through 3 loops on hook. (Decreases 1 st and worked over 2 sts)
Single crochet 3 sts together (sc3tog): (Insert hook in next st, yo and draw up a loop) 3 times, yo and draw through 4 loops on hook. (Decreases 2 sts and worked over 3 sts)
Pattern Notes
Squares are worked flat in rows. Borders are worked in the round.
Stripe sequence: Work chain and Rows 1-2 with CA, then change color every 2 rows. Change color in last YO of final st of row. Unused colors are carried up the side of square. Border is worked in CB.
Pattern
Square (Make Eight)
With CA, ch 28.
Row 1: Turn, skip 1 ch, *sc in next 3 sts, 3 sc in next st, sc in next 3 sts, ** sc3tog; rep from * across, ending last rep at **.
Row 2: Turn, ch 1, sc2tog, sc in next 2 sts, *3 sc in next st, ** sc in next 3 sts, sc3tog, sc in next 3 sts; rep from * across, ending last rep at ** with 4 sts remaining, sc in next 2 sts, sc2tog.
Rows 3-14: Rep Row 2, 12 more times, following stripe sequence.
Fasten off CA, changing to CB in last YO of final sc2tog of Row 14.
Border
Rnd 1: Ch 3 (counts as dc), dc in next st, *hdc in next st, sc in next st, sl st in next st, sc in next st, hdc in next 2 sts,** dc in next 3 sts,*** hdc; rep from *, ending last rep at ** with 1 st remaining on side of row, (2 dc, ch 2, 2 dc) in last st, turn and work along straight edge, dc in side st of row across to first row, (2 dc, ch 2, 2 dc) in side st of first row, turn to work along unworked side of foundation ch, sk first st, hdc, dc in next 3 sts, hdc; rep from * to *** across row to last 2 sts, hdc in next 2 sts, turn and work along straight edge, (2 dc, ch 2, 2 dc) in side st of first row, dc in side st of each row to last working over yarn, (2 dc, ch 2, dc) in same st as beginning ch-3, join with sl st to top of ch-3. Fasten off.
Assembly
If necessary, spray block to 6” square before assembly. With RS of 2 squares facing and chevron patterns perpendicular, join with evenly spaced sl sts in CA on wrong side across, being careful to avoid puckering. Join row of 2 squares to other row of 2 squares to form 2 panels with 4 squares each.
With right sides of 2 panels facing, join with evenly spaced sl sts in CB on wrong side around 3 sides, being careful to avoid puckering. Place stitch marker in loop on hook to secure, remove hook.
With tapestry needle, weave in ends on wrong side of pillow case. Turn pillow case right side out. Return hook to loop and remove stitch marker.
Buttonhole Flap
Row 1: With RS facing, work 32 sts evenly across one side of top edge of pillow case.
Row 2: Turn, ch 1, sc in ea st across.
Rows 3-6: Rep Row 2.
Row 7: Turn, ch 1, sc in next 8 sts, ch 3, sk 2 sts, sc in next 12 sts, ch 3, sk 2 sts, sc in next 8 sts.
Row 8: Turn, ch 1, sc in next 8 sts, 2 sc in ch-3 sp, sc in next 12 sts, 2 sc in ch-3 sp, sc in next 8 sts. Fasten off.
Add Buttons
Position buttons along top edge of other side of pillow case, being sure each button aligns with the buttonhole when folded over. With tapestry needle and yarn, sew buttons in place.
Finishing
Weave in ends. Fold over buttonhole flap and button pillow case closed.


