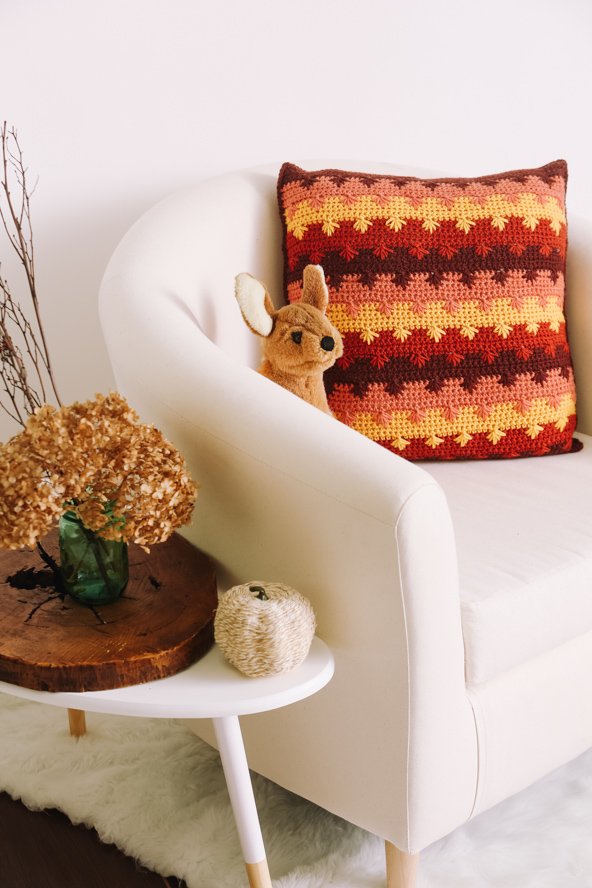
The spike cluster stitch makes gorgeous Japanese maple leaves on this pillow. Beautiful fall tones make the pattern on this pillow stand out in a striking way.
Skill Level: Easy
Size: 18” x 18″
Gauge: 16 sts and 18 rows = 4” [10 cm] in sc after wet blocking
Materials
Yarn:
![]() Cascade 220 (100% Wool; 220 yards [201 meters]/100 grams): 2454 Mahogany (MC), 2 balls; 2454 Provence (CC1), 1 ball; 7827 Goldenrod (CC2), 1 ball; 2451 Nectarine (CC3), 1 ball.
Cascade 220 (100% Wool; 220 yards [201 meters]/100 grams): 2454 Mahogany (MC), 2 balls; 2454 Provence (CC1), 1 ball; 7827 Goldenrod (CC2), 1 ball; 2451 Nectarine (CC3), 1 ball.
Hook: US size H/8 (5.0 mm)
Notions: Tapestry needle; eight ¾” (19 mm) buttons; 18″ x 18″ pillow form; needle and thread to sew buttons
Special Stitches
SPike Cluster stitch (SPC): Be sure the loops that are created are loose enough to not pull down the sc fabric. Count down 1 row and 2 sts over to the right and pull up a loop. Count down 2 rows and over 1 st to the right and pull up a loop. Count down 3 rows and pull up a loop. Count down 2 rows and 1 st to the left and pull up a loop. Count down 1 row and over 2 sts to the left and pull up a loop, 6 loops on hook. Insert hook into next sc, yarn over and pull up a loop. Yarn over and pull through all loops on hook.
Pattern Notes
Carry the yarn loosely up the side of the pillow front. These will be hidden inside pillow when it is joined together.
Pattern
Pillow Front
With MC, ch 61.
Row 1: Sc in 2nd ch from hook, sc in each ch to end, turn – 61 sc.
Row 2: Ch 1, sc in each sc across to end of row, turn.
Rows 3-6: Same as Row 2.
Row 7: With CC1, ch 1, sc in next 3 sc, SPC in next sc, *sc in next 5 sc, SPC in next sc; rep from * to last 3 sc, sc in next 3 sc, turn.
Row 8: Ch 1, sc in each sc to end of row, turn.
Rows 9-12: Same as Row 8.
Row 13: With CC2, ch 1, sc in next 6 sc, SPC in next sc, *sc in next 5 sc, SPC in next sc; rep from * to last 6 sc, sc in next 6 sc, turn.
Row 14: Ch 1, sc in each sc to end of row, turn.
Rows 15-18: Same as Row 14.
Repeat Rows 7-18 using CC3 and MC, then start again on Row 7 with CC1.
Cont to work in this manner until CC3 has been used 3 times. Pillow measures 18″.
Fasten off all yarns except MC.
Button Flap
Row 1: With MC, ch 1, sc in next 6 sc, SPC in next sc, *sc in next 5 sc, SPC in next sc; rep from * to last 6 sc, sc in next 6 sc, turn.
Row 2: Ch 1, sc in each sc to end of row, turn.
Rep Row 2 until 4″ of MC has been worked.
Buttonholes
Row 1: Ch 1, *sc in next 5 sc, ch 2, sk 2 sc; rep from * 7 more times, sc in next 5 sc, turn.
Row 2: Ch 1, sc in each sc to end of row, turn.
Rep Row 2 twice more.
Fasten off.
Pillow Back
Row 1: With MC with RS of pillow facing, sc in each ch of starting ch, turn – 61 sc.
Row 2: Ch 1, sc in each sc to end of row, turn.
Rep Row 2 until Pillow Back measures 18″.
Fasten off.
Finishing
Fold pillow in half along the beginning chain so WS of front and back of pillow are facing each other. Beginning at bottom right corner, sc through each turning ch on front and back of pillow to join the 2 pieces together. Continue until the entire right side of pillow is joined. Sc in each turning ch, each sc of button flap, and each turning ch on left side until you reach where the back and fronts meet. Sc through each turning ch on front and back of pillow to join the 2 pieces together. Continue until the entire left side of pillow is joined.
Fasten off.
Weave in ends.
Block pillow.
Insert pillow form and mark where buttons need to be sewn on back.
Sew buttons.


Nice Japanese Maple Pillow pattern
Why can’t we PIN projects from your site? I might buy your magazine then.