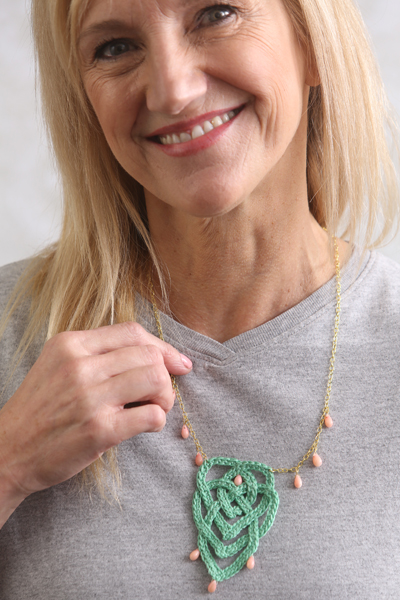
This special celtic knot, symbolizing motherhood with its two intertwined hearts, will make a perfect gift for your mom this Mother’s Day. Simply crochet four cords and weave them according to the diagram included. A gold chain and dainty beads add a classy finishing touch.
Skill Level: Easy
Size: 3” L x 2¼” W (Pendant); Necklace Length = 21¾”
Gauge: 7 sc = 1”
Materials
Yarn:
![]() DMC Embroidery Floss (100% cotton; 9 yards [8 meters]): #913 (2 skeins)
DMC Embroidery Floss (100% cotton; 9 yards [8 meters]): #913 (2 skeins)
Hook: US size 2.75 mm steel hook
Notions: 20” necklace chain, clasp, 4 jump rings (4.0 mm), 1 jump ring (6.0 mm), 10 teardrop coral beads (5.0 mm), embroidery needle, 1 yd gold wire (26 gauge) or 10 eye pins, matching sewing thread, photocopy/print out of knot diagram, 5” x 5” piece of cork or Styrofoam, 20 straight sewing pins, jewelry pliers
Pattern Notes
Four cords are crocheted using the sc st, and then the cords are woven according to diagram given. Mark each cord with different stitch marker to be able to identify them. Work all stitches in the BACK BAR of the chain. Fasten off all cords leaving a long tail to use in assembly. When weaving knot, use sewing pins to hold cords in place. All cord ends meet along the center of the pendant.
Wire wrap for beads: Cut about 2½” length of wire and thread through bead so ends are equal length protruding from bead. Twist lengths together and wrap twisted ends around pliers to form a loop. Trim off excess and hook onto chain.
Pattern
Cord A: Ch 30, Sc in 2nd ch from hook and in each ch across. Fasten off.
Cord B: Ch 34. Sc in 2nd ch from hook and in each ch across. Fasten off.
Cord C: Ch 45. Sc in 2nd ch from hook and in each ch across. Fasten off.
Cord D: Ch 43. Sc in 2nd ch from hook and in each ch across. Fasten off.
Steam block all cords, making sure to lay flat. Let dry completely.
Weaving the Knot
Pin knot diagram to cork.
Starting with Cord A and with RS facing, lay cord along path shown in Diagram (white).
Lay Cord B on path as shown in Diagram (blue) making sure to pass correctly over Cord A at *.
Using embroidery needle and yarn tails, sew cord ends together.
With Cords A and B on Diagram, lay Cord C along path shown in Diagram (red) making sure to pass correctly over and under throughout.
Lay Cord D along path shown in Diagram (green) making sure to pass correctly over and under throughout.
Using embroidery needle and yarn tails, sew ends of Cords C and D together.
Secure all crossings with pins and remove cords from Diagram.
Turn over so WS is facing. Using embroidery needle and yarn tails, sew all crossings making sure stitches do not show on RS of work.
Finishing
Cut necklace chain into 2-10” lengths.
Using smaller jump rings, attach chain to pendant using photo as a guide.
Attach large jump ring to one end of necklace chain.
Attach small jump ring and clasp to other end of necklace chain.
Using needle and sewing thread, attach 4 beads to pendant as shown in photo.
Using wire and pliers, attach 6 beads to chain length (use photo as a guide). See Pattern Notes. 


where is the kinot diagram for the necklace? Where is the location on the pattern
Hello! Charts are always on the far right side of the pattern page underneath the photos. Here is a direct link to the charts as well: https://www.ilikecrochet.com/wp-content/uploads/Celtic-Knot-Necklace-Diagram-JERyan.pdf
Thanks! – Nicola, Editor
I love your Celtic Knot! Is the DMC thread that you used the lighter weight thread used mainly for paper embroidery and cross stitch …..or….the heavier weight thread that is more like cord. I’m assuming it’s the latter, but wasn’t sure. Thx!
There’s no diagram
I found the diagram
I love everything I see. Haven’t crocheted in a while, but can’t wait to start again!!!!
need diagram please
Knot diagram?
Need direction on weaving
Very pretty and right in time for St. Patrick’s Day.
Where the diagram?
This is lovely, but where is the knot diagram?? Thanks!
Hi Kathleen,
The post has been updated with the diagram. Apologies for the omission!
Editor of ILC
I am still not seeing the diagram
Did not find the diagram for weaving?
Hi Anne,
The post has been updated with the diagram. Apologies for the omission!
Editor of ILC