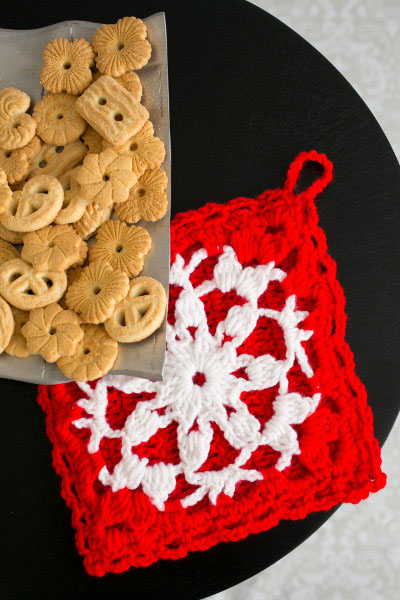
This matching potholder and ornament set will make preparing for the holidays a cinch! To make things easier, the potholder uses the same snowflake motif created as the ornament, with some modifications.
Skill Level: Easy
Size: Potholder = 8 ½” square; Ornament = 7 ¼” square
Gauge: Not important for this project
Materials
Yarn: Red Heart Classic (100% acrylic; 190 yards [174 meters]/100 grams): #0001 White (1 skein), #0902 Jockey Red (1 skein)
Hook: US size G/6 (4.5 mm) hook or size needed for gauge
Special Stitches
Beginning Cluster (beg cl): Ch 3, holding back last loop of each stitch on hook, 3 dcs in same place as beginning ch 3, yo, pull through all loops on hook.
Cluster (cl): Holding back last loop of each stitch on hook, 4 dcs in same place, yo, pull through all loops on hook.
Pattern
Ornament
Rnd 1: Ch 8 and join with a slip stitch to form a ring, ch 3, 2 dcs in ring, ch 7, (3 dcs, ch 7) 7 times into ring, join with a slip stitch in 3rd ch of beginning ch 3.
Rnd 2: Slip stitch into next 2 dcs and 2 chs of next ch space, beg cl into ch 7 space, *ch 9, cl into next ch 7 space, repeat from * 6 times, ch 9, join with a slip stitch to top of beg cl.
Rnd 3: Ch 1, (beg cl, ch 5, cl) into next ch 9 space,*ch 7, (2 scs, ch 5, 2 scs) into next ch 9 space, ch 7, (cl, ch 5, cl) in next ch 9 space, repeat from * around, join with a slip stitch in beg cl, ending slip stitch in 2 chs of ch 5 space, sc in same space, ch 12, slip stitch into beginning sc (loop made) and fasten off.
Potholder Front (Snowflake)
Rnd 1: With white ch 8 and join with a slip stitch to form a ring, ch 3, 2 dcs in ring, ch 7, (3 dcs, ch 7) 7 times into ring, join with a slip stitch in 3rd ch of beginning ch 3.
Rnd 2: Slip stitch into next 2 dcs and 2 chs of next ch space, beg cl in ch 7 space, *ch 9, cl in next ch 7 space, repeat from * 6 times, ch 9, join with a slip stitch to top of beg cl.
Rnd 3: Ch 1, *(2 scs, ch 5, 2 scs) in next ch 9 space, ch 7, (cl, ch 5, cl) in next ch 9 space, ch 7, repeat from * 3 times, join with a slip stitch in first sc and fasten off.
Rnd 4: Join red in ch 5 space between 2 groups of 2 scs, 2 scs in same space, *ch 5, 2 scs in next ch 7 space, ch 5, (cl, ch 5, cl) in next ch 5 space, ch 5, 2 scs in ch 7 space, ch 5, **2 scs in next ch 5 space, repeat from * twice and from * to ** once, join to first sc.
Rnd 5: Sc in same stitch, sc in next stitch, 3 scs in next ch 5 space, 1 hdc in each of next 2 scs,
3 scs in next ch 5 space, *1 sc in top of next cl, (sc, hdc, dc, hdc, sc) in next ch 5 corner space, sc in next cl, **(3 scs in next ch 5 space, 1 hdc in each of next 2 scs, 3 scs in next ch 5 space, 1 sc in each of next 2 scs, 3 scs in next ch 5 space, 1 hdc in each of next 2 scs, 3 scs in next ch 5 space, repeat from * around, ending last repeat at **, 3 scs in next ch 5 space, 1 hdc in each of next 2 scs, 3 scs in next ch 5 space, join to beginning sc and fasten off.
Potholder Back
Row 1: With red ch 26, dc in 4th ch from hook and in each ch across, turn. (24 dcs)
Row 2 (RS): Ch 3, 1 dc in each dc across, turn.
Rows 3-10: Ch 3, 1 dc in each dc across, turn. Do not fasten off after last row.
Potholder Joining
Note: Work through both sides of potholder when joining.
With wrong side of Front and right side of Back facing (sc, ch 14, sc) in corner stitch, work along side edge *ch 3, skip 2 stitches of front, sc in next stitch of front and space between 2 rows of back, repeat from * across evenly spacing 8 more ch 3 spaces, (sc, ch 3, sc) in last corner stitch.
Work along bottom edge *ch 3, skip 2 stitches of front and 2 dcs of back, sc in next stitch, repeat from * across evenly spacing 8 more ch 3 spaces, (sc, ch 3, sc) in last corner stitch.
Work along side edge as for opposite side edge.
Work along top edge as for bottom edge, join to beg sc and fasten off. 


I like this
I never thought to put the snowflake with potholder.